Creating Resources
Before we can add content and use it in our site’s front-end, we need to define the management tools for it. This process is done entirely within the control panel—no coding is required to create new content types!
Our content outline included an About page and a place to keep global site information—we’ll circle back and work on those after we see the blog through.
#Supporting Features
Authors will primarily interact with entries as they create blog posts, but some of the features we’ve planned depend on other resources that make sense to configure ahead of time.
#Create an Asset Volume
First, let’s create a place to upload the files for our feature and post images.
Assets are organized into volumes, which sit on top of a filesystem. Filesystems are how Craft talks to different storage providers, while keeping the user interface consistent. For now, we’ll be using your local hard drive—but it could be a remote service like Amazon S3 or Google Cloud Storage.
We’ll create a local asset volume within the web root, so our images are accessible from a web browser:
In the control panel, navigate to
- Settings
- Assets
Click + New volume;
Enter “Images” in the Name field ;
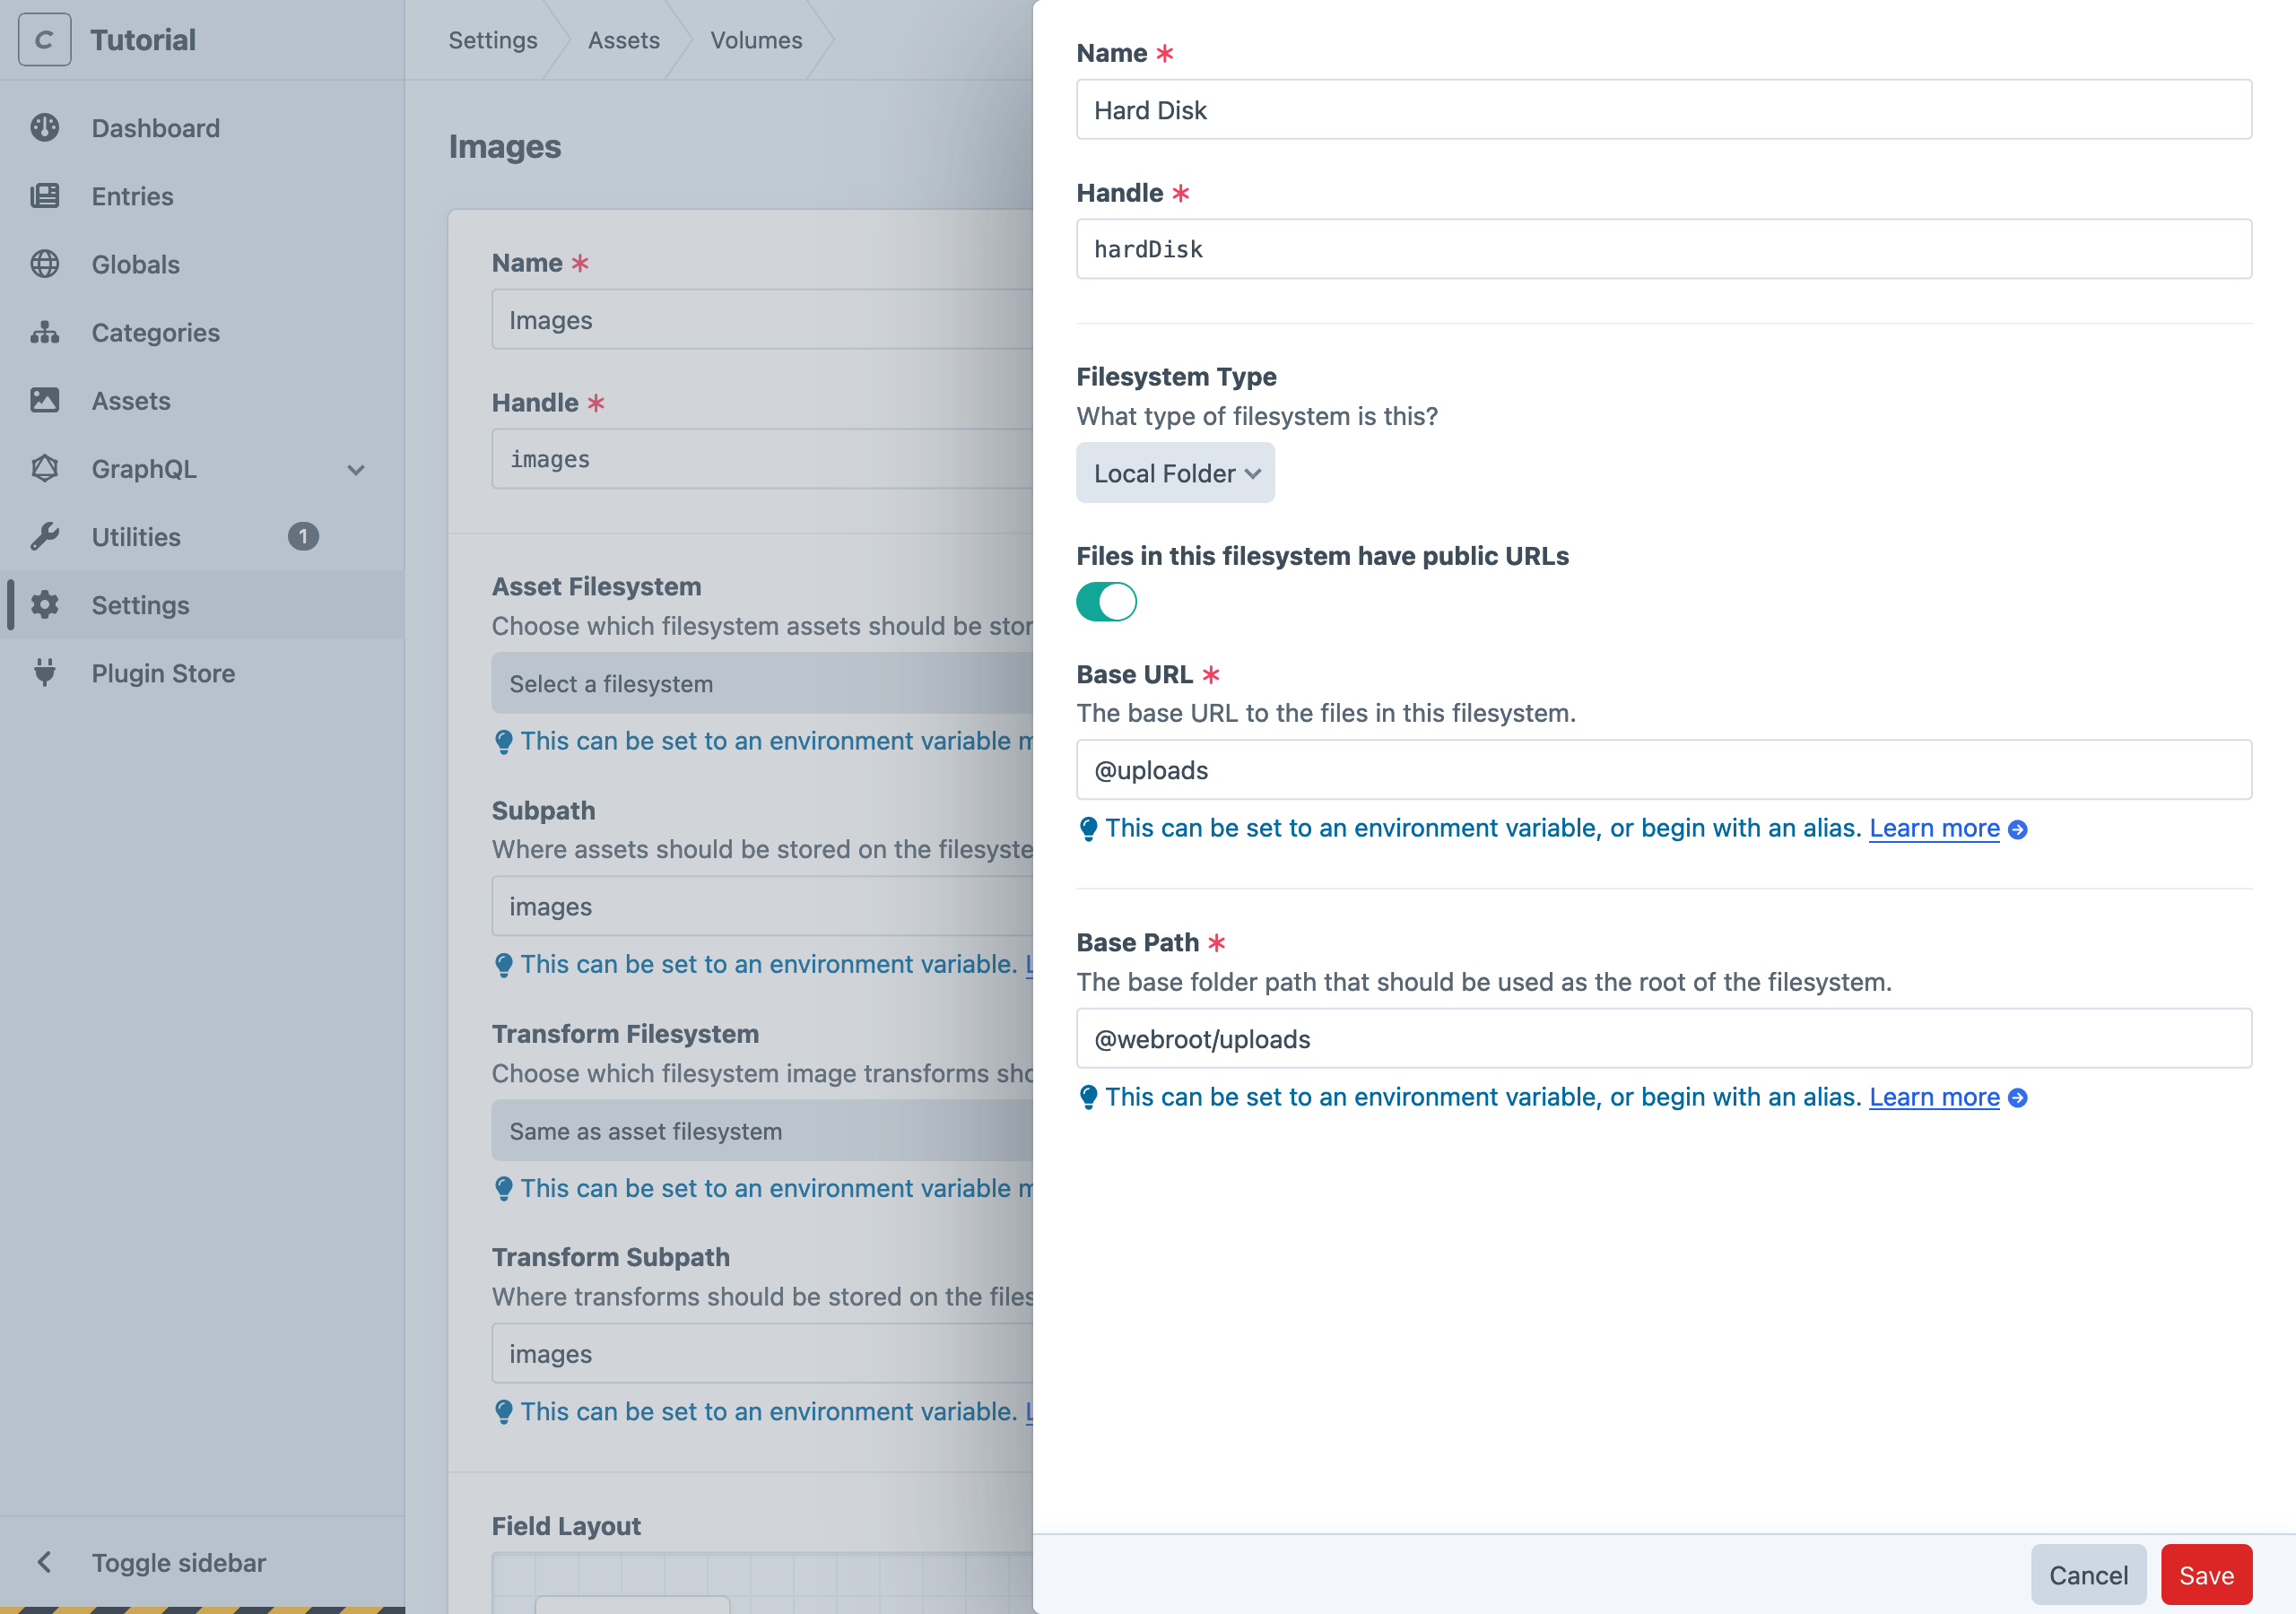
Click the Asset Filesystem menu and select Create a new filesystem…;
Within the filesystem creation slideout that opens, provide these settings:
- Name : “Hard Disk”
- Files in this filesystem have public URLs : On/Enabled
- Base URL :
@uploads - Base Path :
@webroot/uploads
Save the filesystem, and ensure it has populated the Asset Filesystem menu.
We chose a generic Base URL and Base Path here so that the filesystem can be reused later by multiple volumes—say, one for “Documents” that you want to keep separate from photographic media. The Subpath setting on the volume (see below) will ensure our images live within a specific folder of the filesystem!
Set the volume’s Subpath and Transform subpath both to
images;Save the Asset Volume.
Switch back to your code editor, and open config/general.php. Near the end of the file, you’ll see the @webroot alias we just used when configuring the filesystem. This ensures we have a reliable means of referring to the web/ directory of our project, from resources we configure elsewhere; we still need to define the @uploads alias, though!
Add this to the array passed to ->aliases(...), then save the file:
return GeneralConfig::create()
    // ...
    ->aliases([
        '@webroot' => dirname(__DIR__) . '/web',
        '@uploads' => App::env('PRIMARY_SITE_URL') . '/uploads',
    ])
;
Here, we combine the value of the PRIMARY_SITE_URL environment variable (automatically provided by DDEV) with a path segment (/uploads)—this corresponds to the filesystem’s Base Path, when accessed via HTTP. In practical terms, we’re using predefined values to build consistent on-disk paths (like /var/www/html/web/uploads/images) and URLs (like https://tutorial.ddev.site/uploads/images) for every uploaded asset.
You may have noticed that Craft suggests existing aliases and environment variables as you input these values via the control panel. If you want to double-check your settings after adding the alias, visit
- Settings
- Filesystems
- Hard Disk
#Create a Category Group
The second resource we need to create is a group for our blog’s categories.
- Navigate to
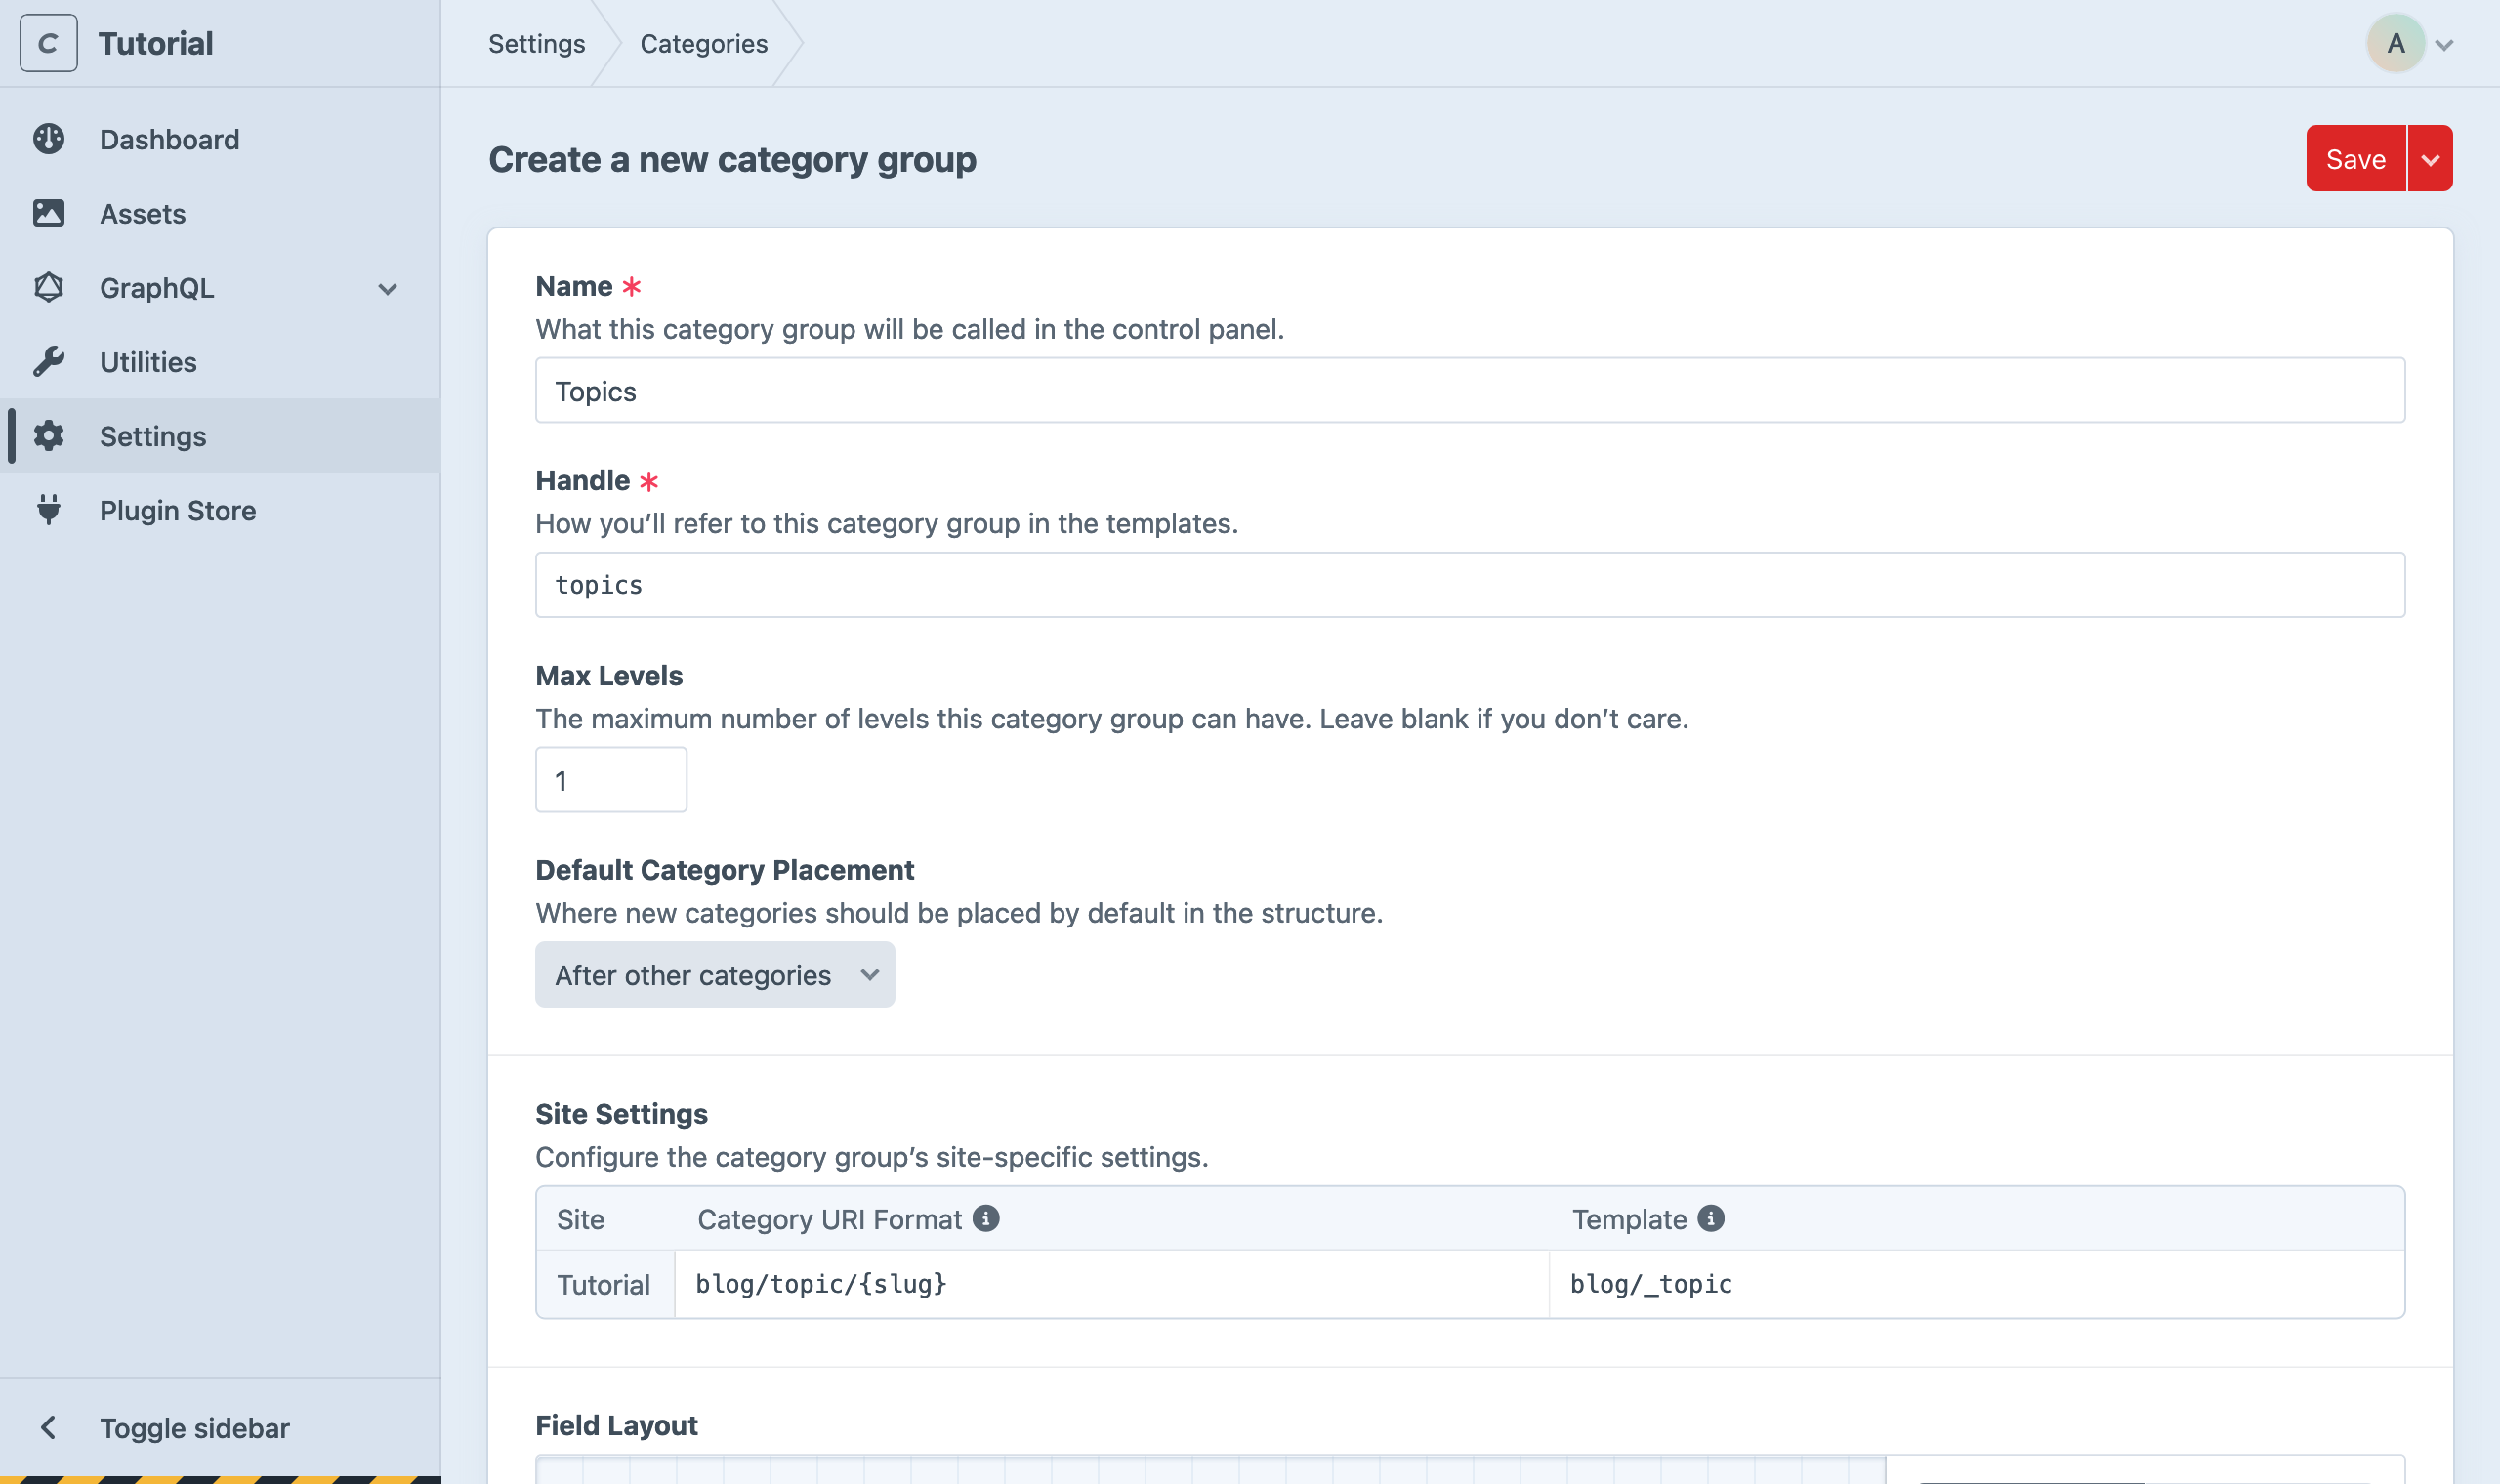
- Choose + New category group;
- In the Name field, enter “Topics”;
- In the Max Levels field, enter
1; - Set the Category URI Format to
blog/topic/{slug}; - Set the Template to
blog/_topic; - Save the category group.
#Creating a Section
With some supporting resources created, it’s time to scaffold our blog’s section, entry type, and all its custom fields. Craft allows us to do this in a single screen, via nested slideouts—we’ll cover them in sequence!
- In the control panel, choose Settings from the main navigation.
- Choose Sections from the “Content” row.
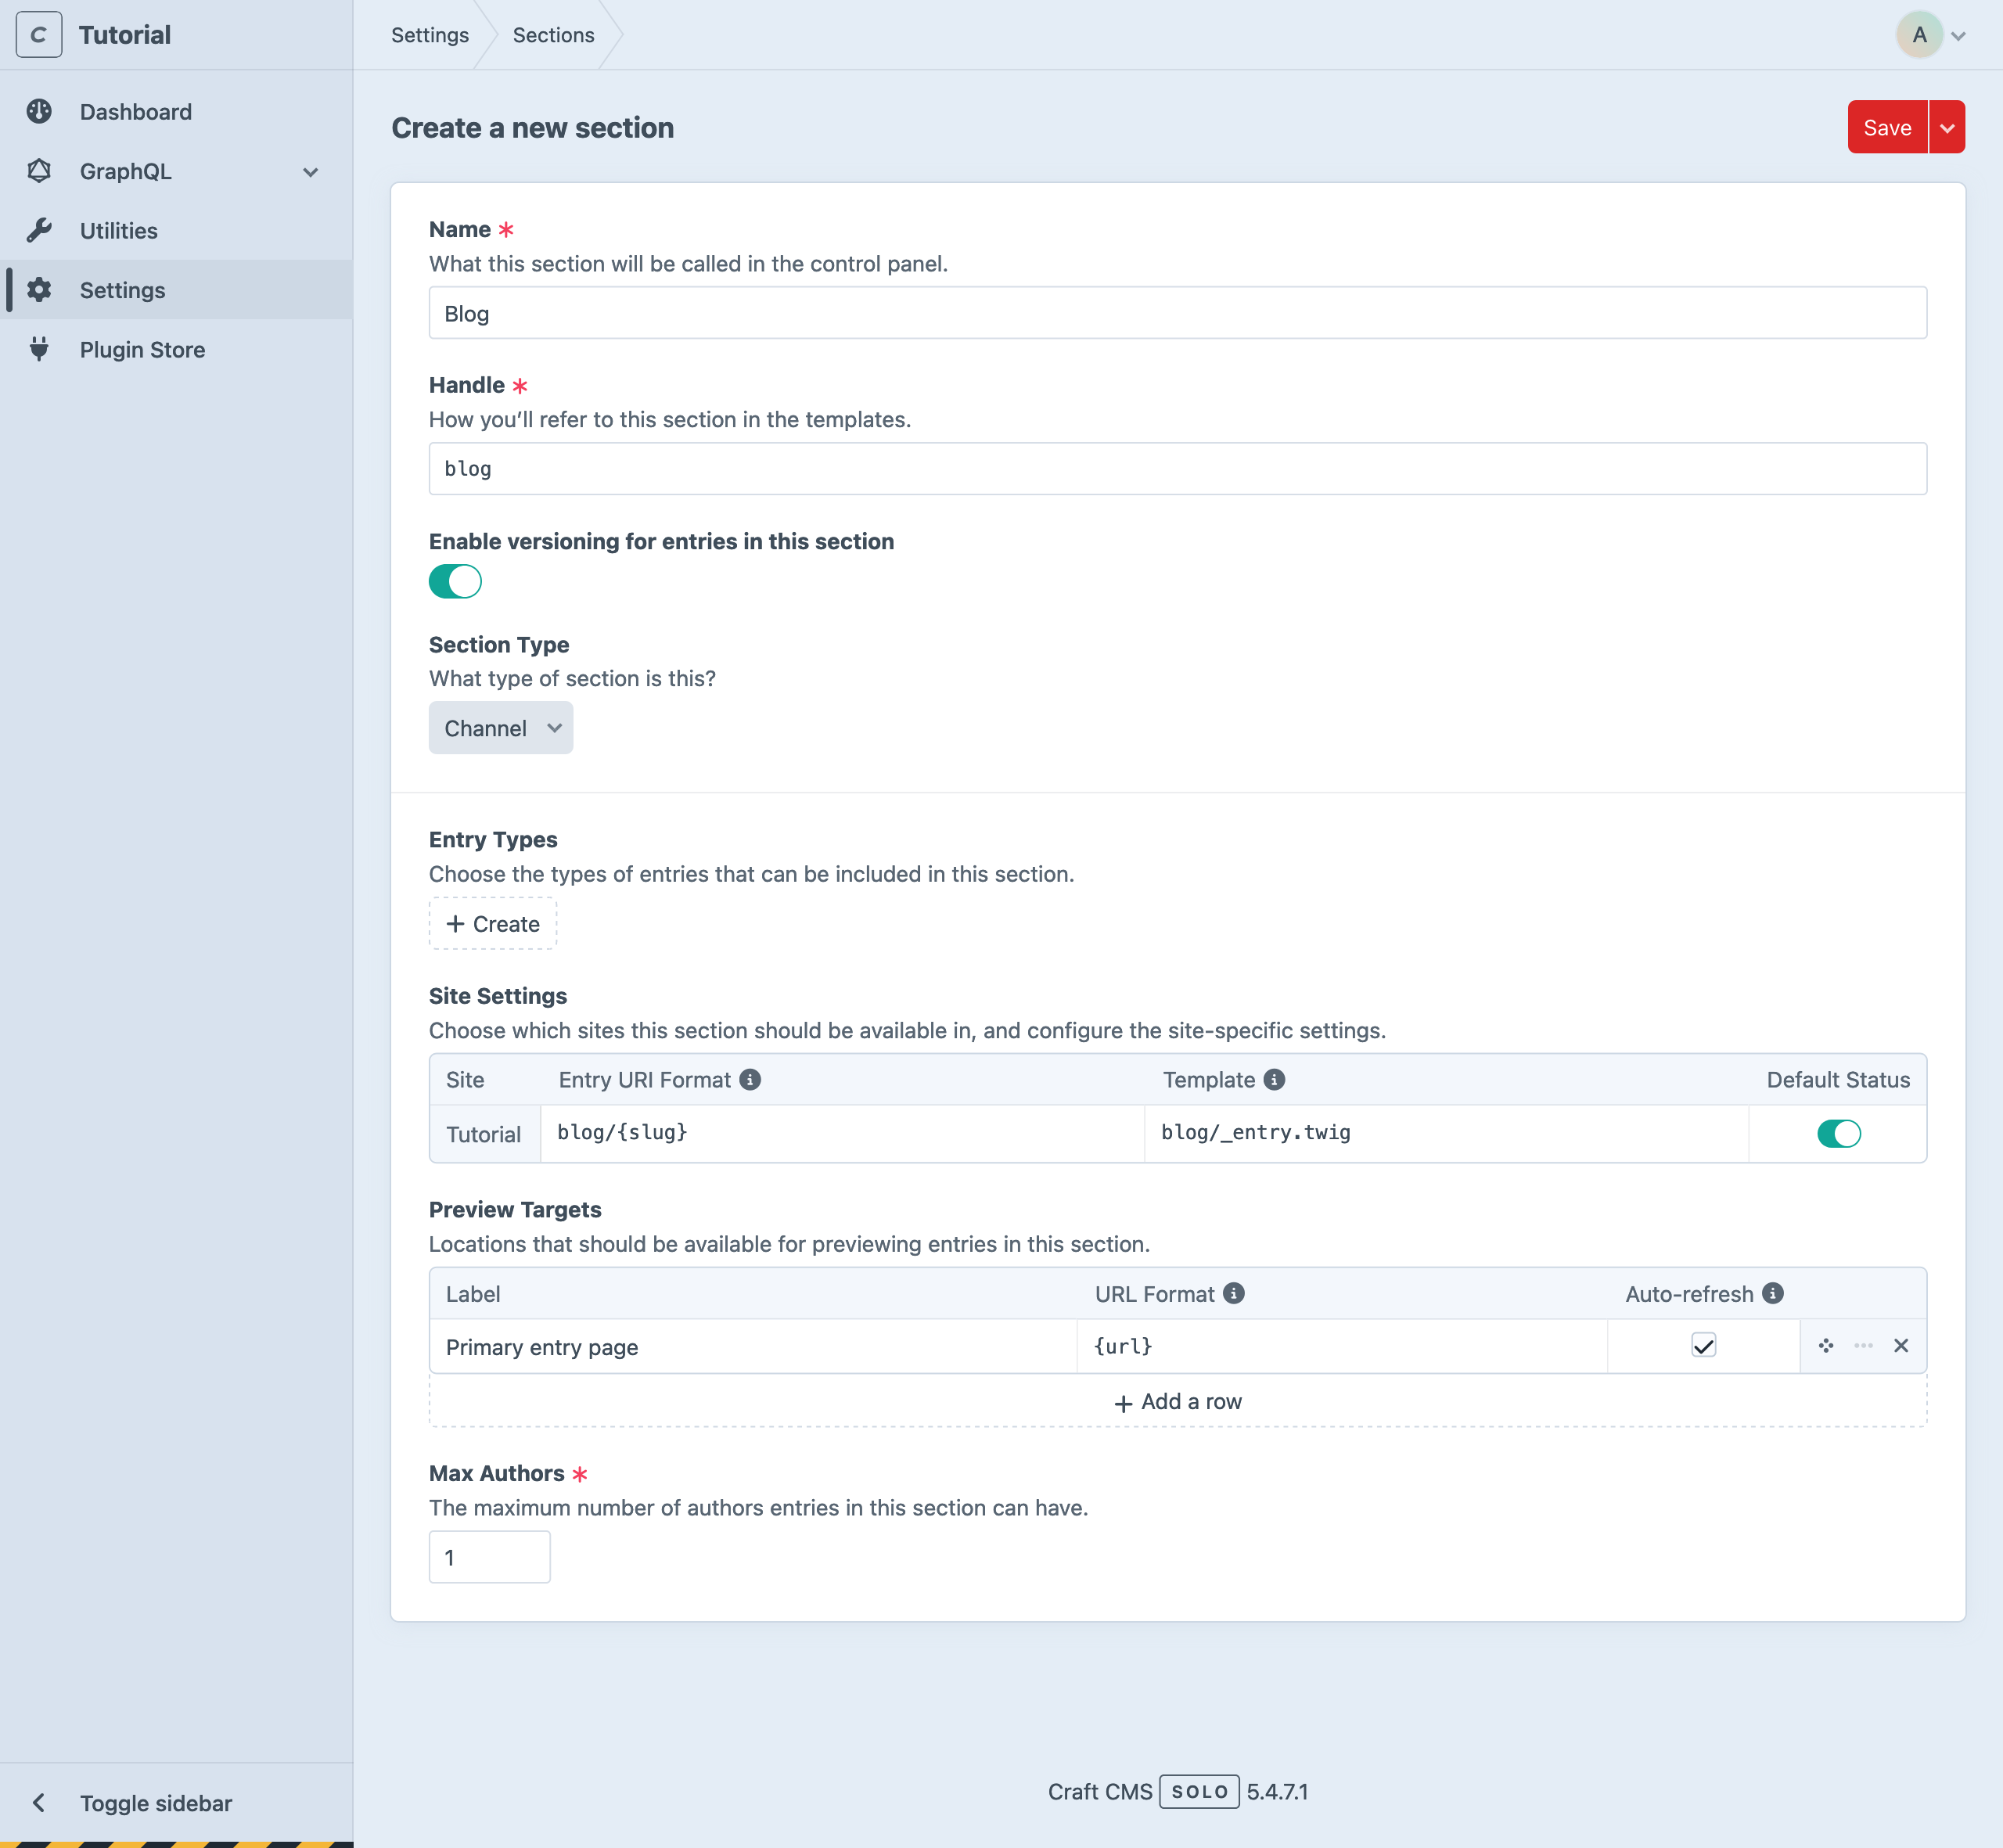
- Choose + New section.
- Enter “Blog” in the Name field.
- Leave the rest of the default settings as they are, ensuring Section Type is set to Channel.
Craft will automatically generate values for the Handle , Entry URI Format , and Template fields. These will come into play in a moment!
Without leaving this screen, we can also create our first entry type. Click + Create within the Entry Types field to open a slideout:
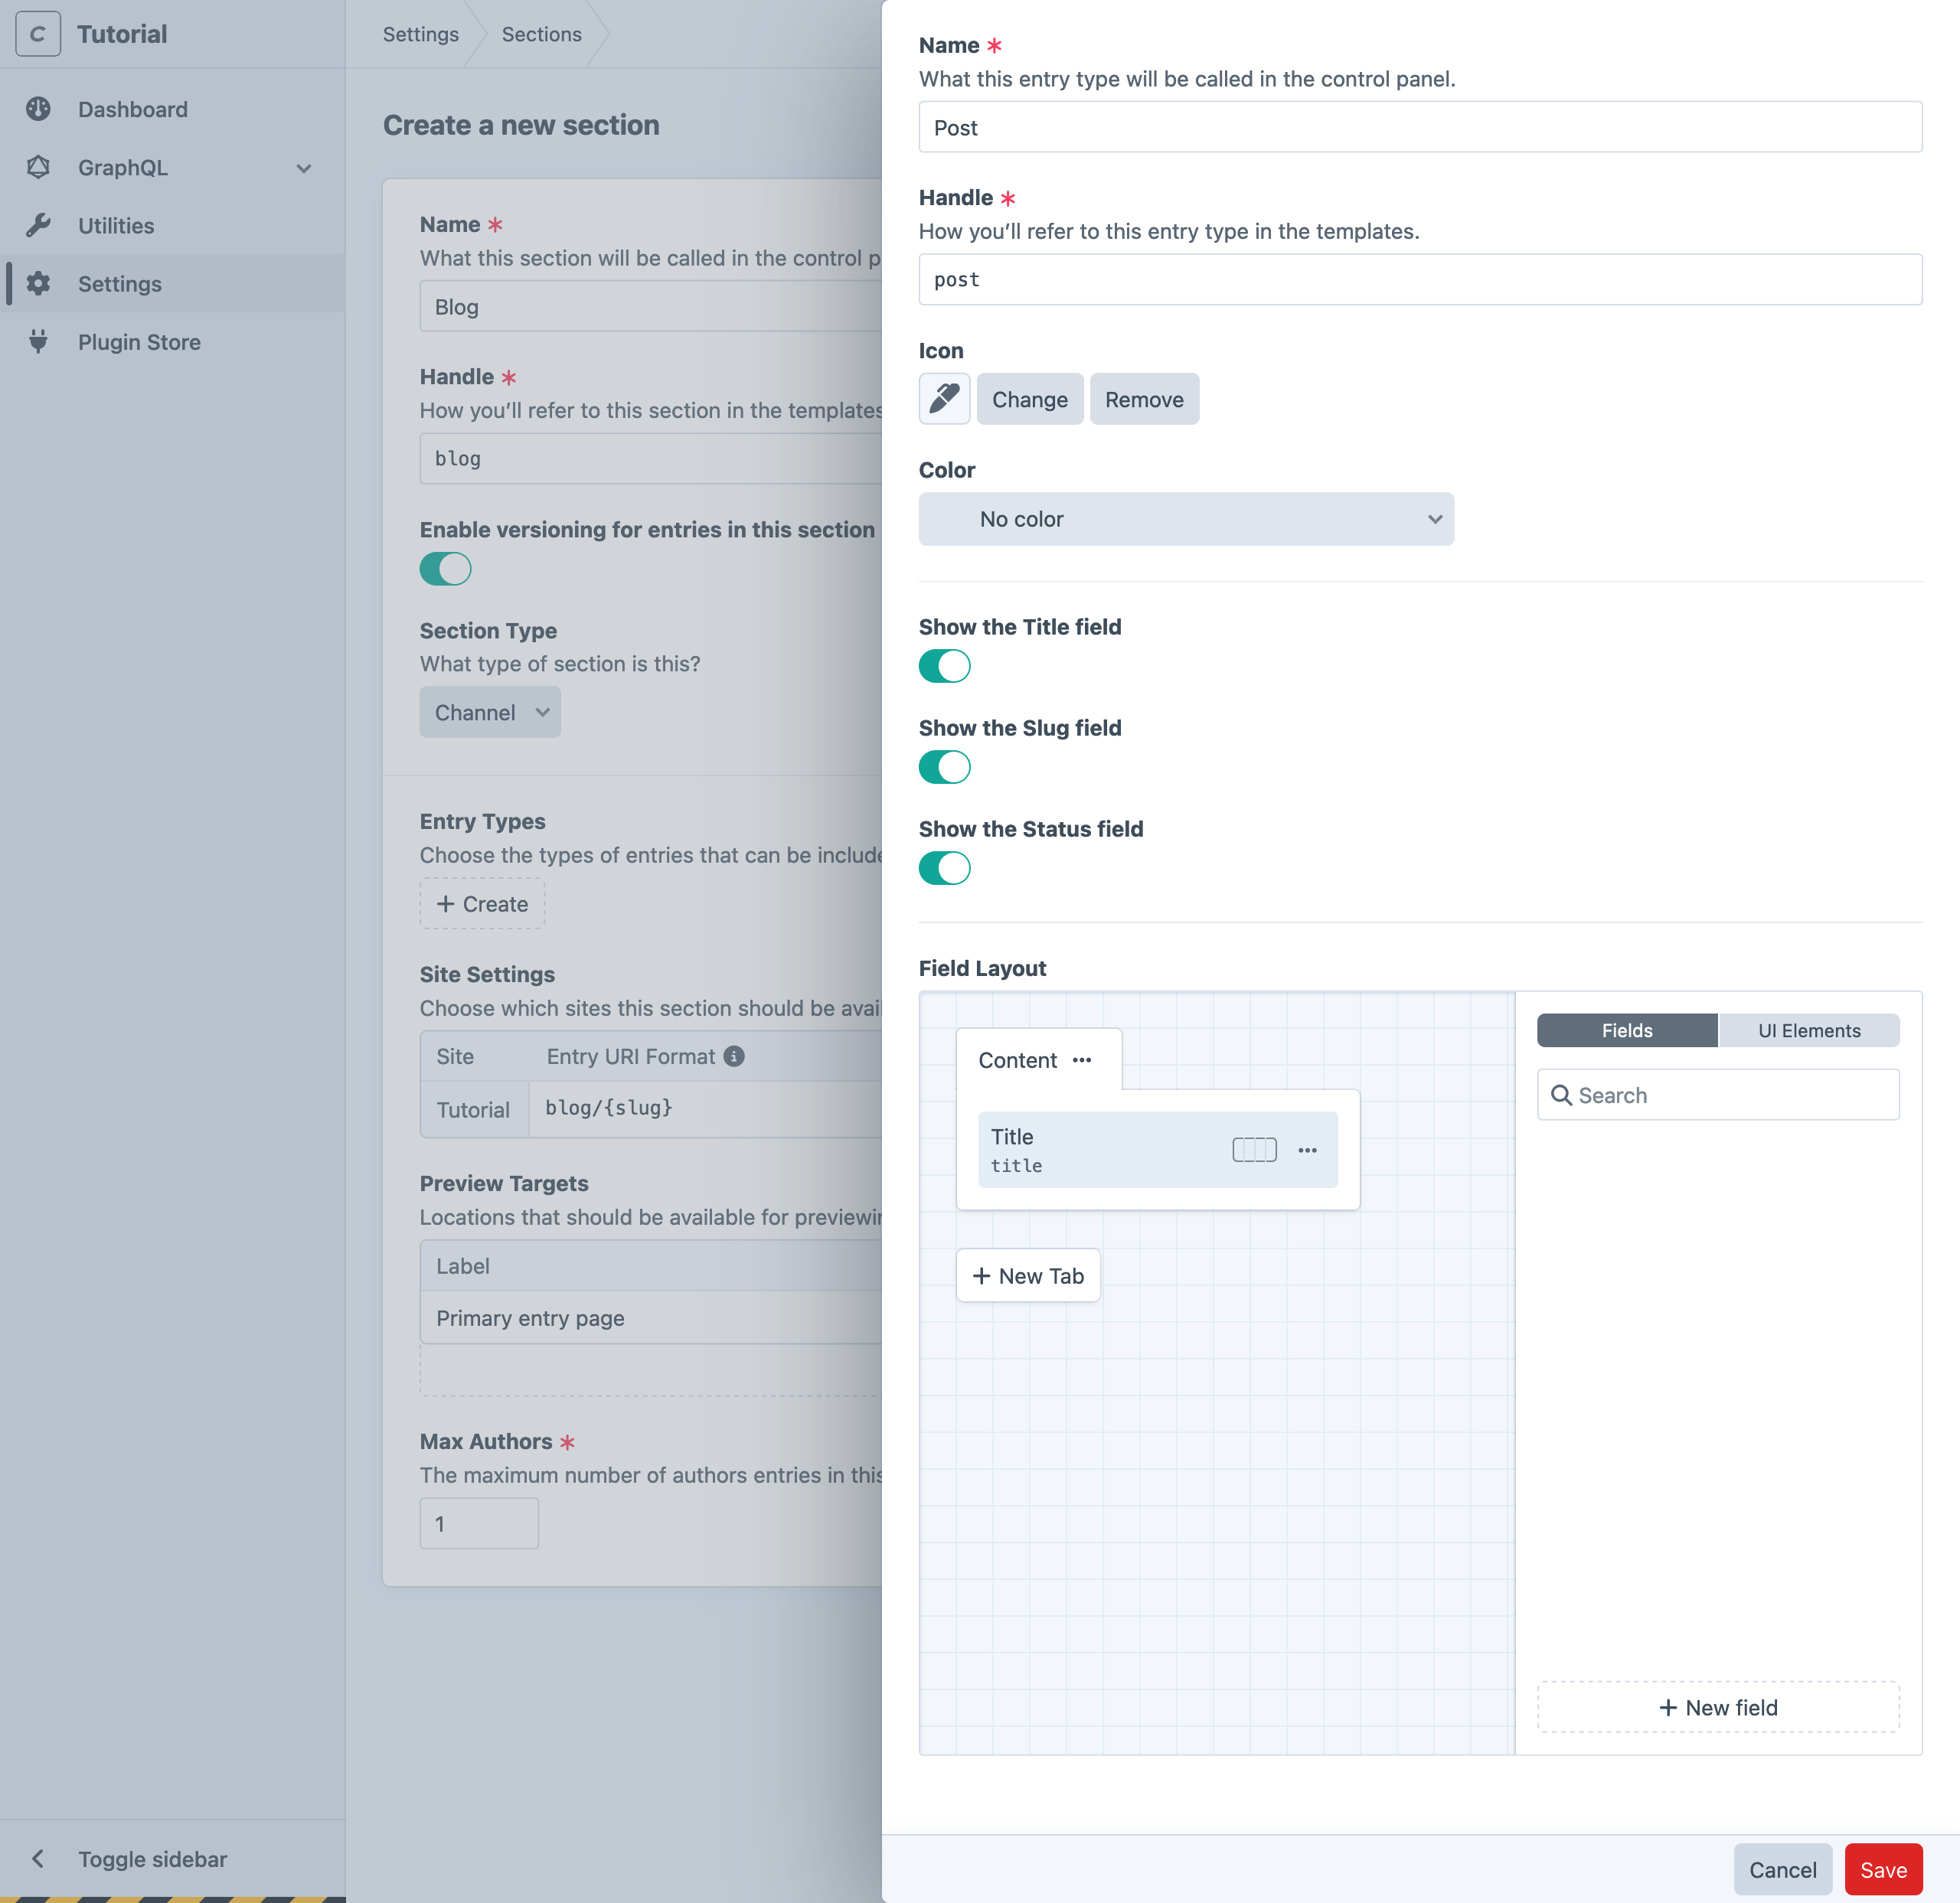
- Enter “Post” in the entry type’s Name field;
- Pick an Icon and Color (optional—we’ll have another opportunity to make better use of these settings, in a moment);
At the bottom of the entry type creation slideout, you’ll find the Field Layout designer.
#Custom Fields
To add a field to our new Post entry type, click the + New field button in the sidebar of the Field Layout.
You may have noticed the field layout designer at the bottom of the asset volume and category group settings screens—every element type in Craft supports the content modeling tools we’re going to cover in this section!
#Summary
The post summary will be entered in a plain text field. We’re going to create a single, generic text field and reuse it in a few places.

- Enter “Text” into the Name field;
- Enable Use this field’s value as search keywords ;
- Enable Allow line breaks ;
- Save the field.
That’s all we need for now! The slideout will close, revealing the text field in the field layout designer sidebar. Drag that field into the Content tab in the field layout.
Our generic field is not very useful to editors, though—how would they know what to enter into a field labeled “Text?” Craft supports reuse of most field types, each instance of which can override the base field’s UI label (what authors see) and handle (how it’s accessed in templates and queries).
On the field layout element you just dragged into the Content tab, open the action menu
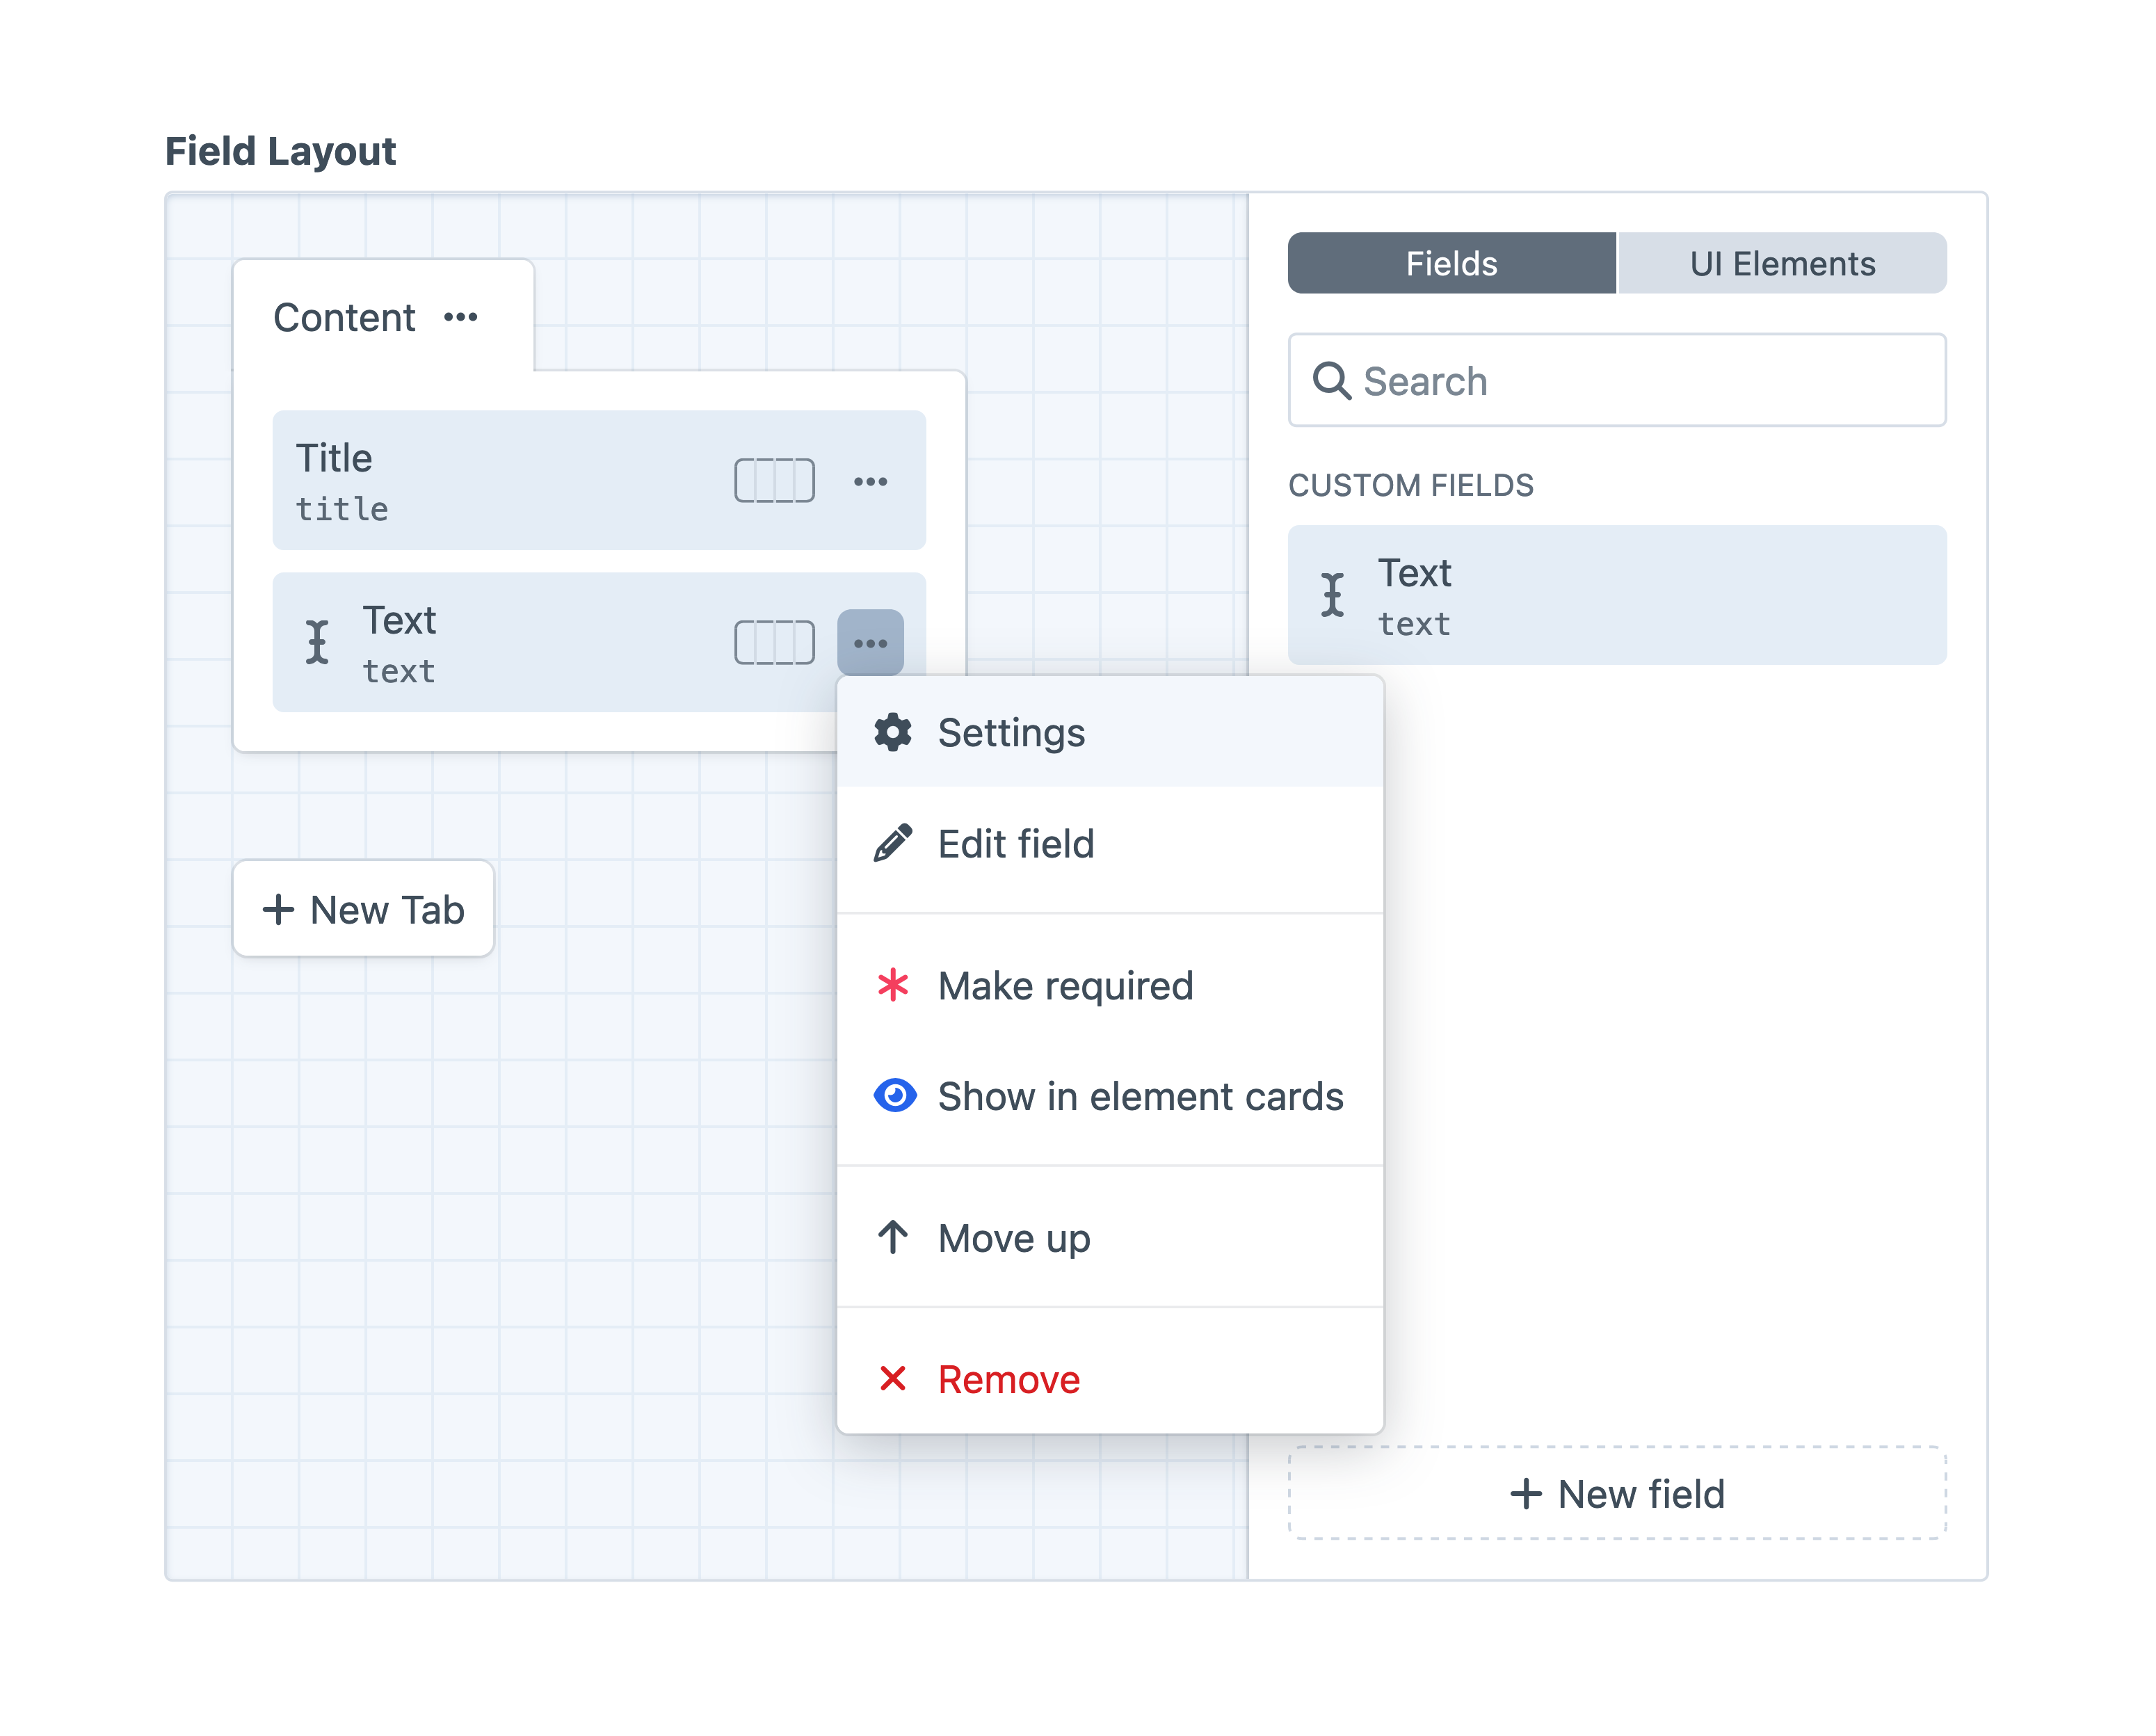
In the slideout that appears, update the Label to “Summary” and the Handle to summary, then click Apply to save the overrides; you should see the new label and handle reflected in the field layout designer, as well as a pencil icon indicating that field instance has customizations.
If you don’t see the pencil icon, make sure the changes were made in the Settings slideout, not the Edit field slideout—the former controls instance-level settings, and the latter re-opens the base field’s configuration.
#Feature Image
Posts’ primary images will be added to an asset field. This one will also be used in a few places, so we’re going to give it a relatively generic name and handle. Click + New Field from the entry type’s field layout designer again to open a slideout:
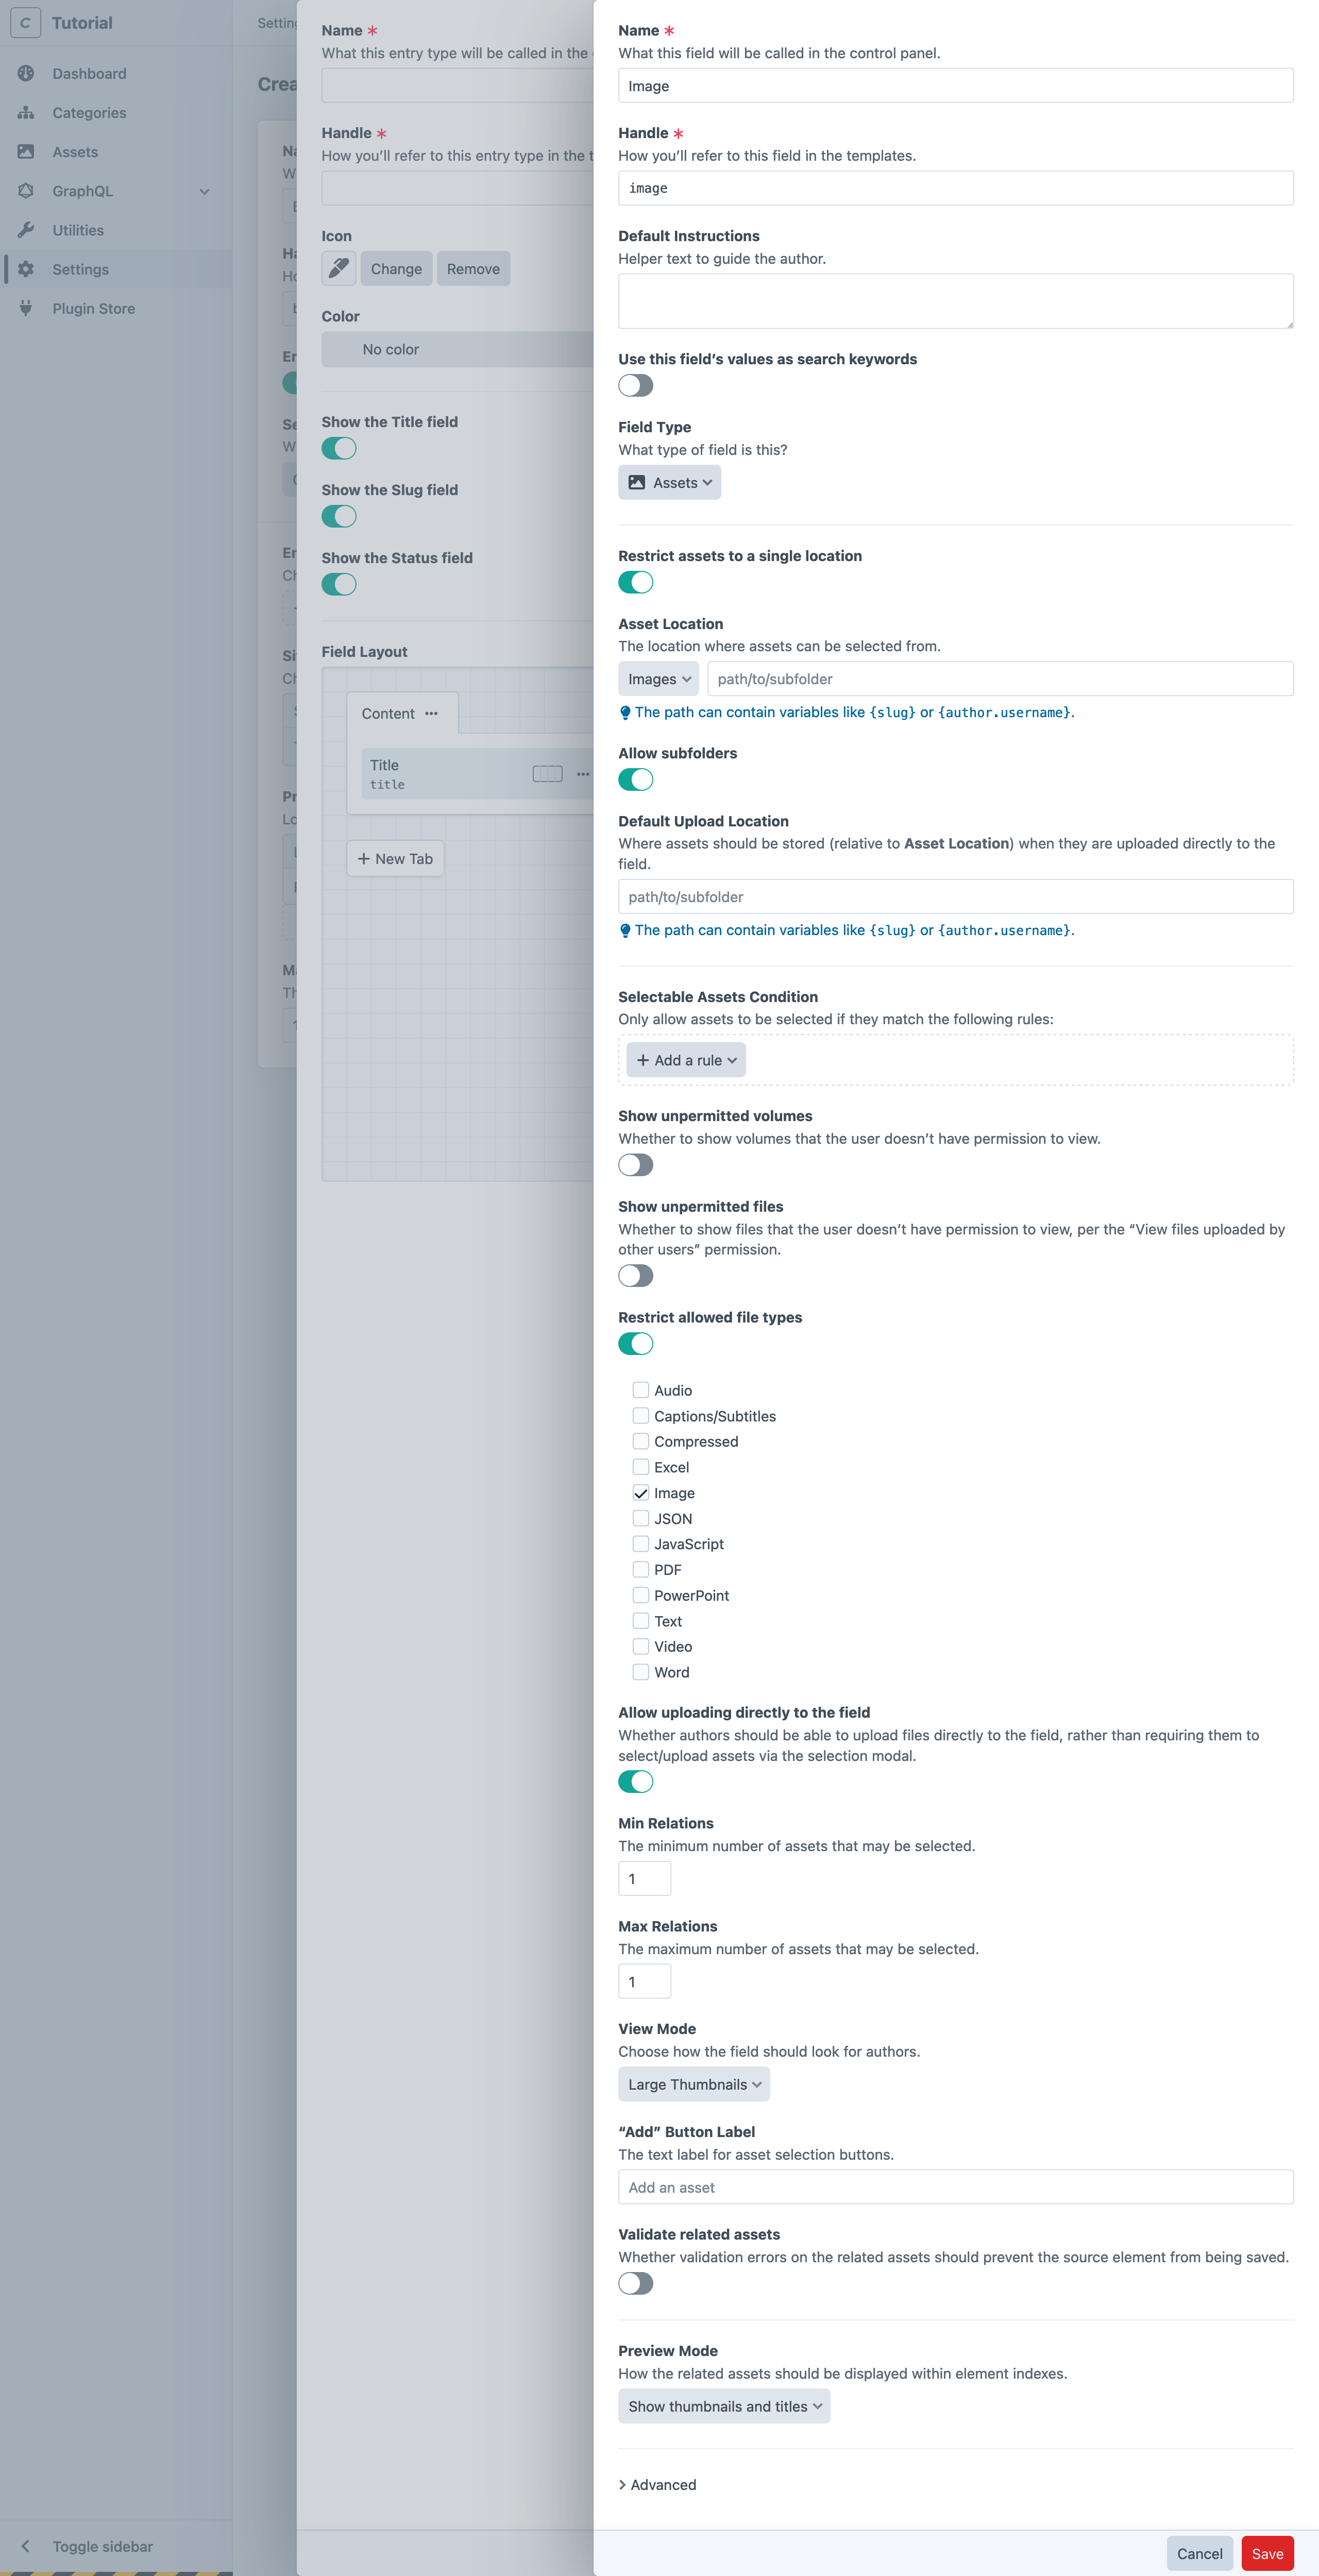
- Enter “Image” into the Name field (and note that Craft automatically generates a Handle of
image); - Select Assets from the Field Type menu—the rest of the page will be updated with options specific to asset fields;
- Enable Restrict assets to a single location? ;
- Select the Images volume from the revealed Asset Location menu;
- Enable Allow subfolders ;
- Leave both path inputs ( + ) empty;
- Enable Restrict allowed file types , then tick Image from the revealed options;
- Set Min and Max Relations to
1; - Use the Large Thumbnails option for the View Mode setting;
- Save the field.
You’ll be dropped back at the entry type slideout. Add the new Image field to the field layout, just as we did for the Text field—then use the action menu
- Update the Label to “Feature Image”
- Set the Handle to
featureImage
Apply those overrides, and verify that the pencil icon has appeared in the field layout element.
From the action menu
#Categories/Topics
Our topics field is significantly simpler! Click + New field again to get started:
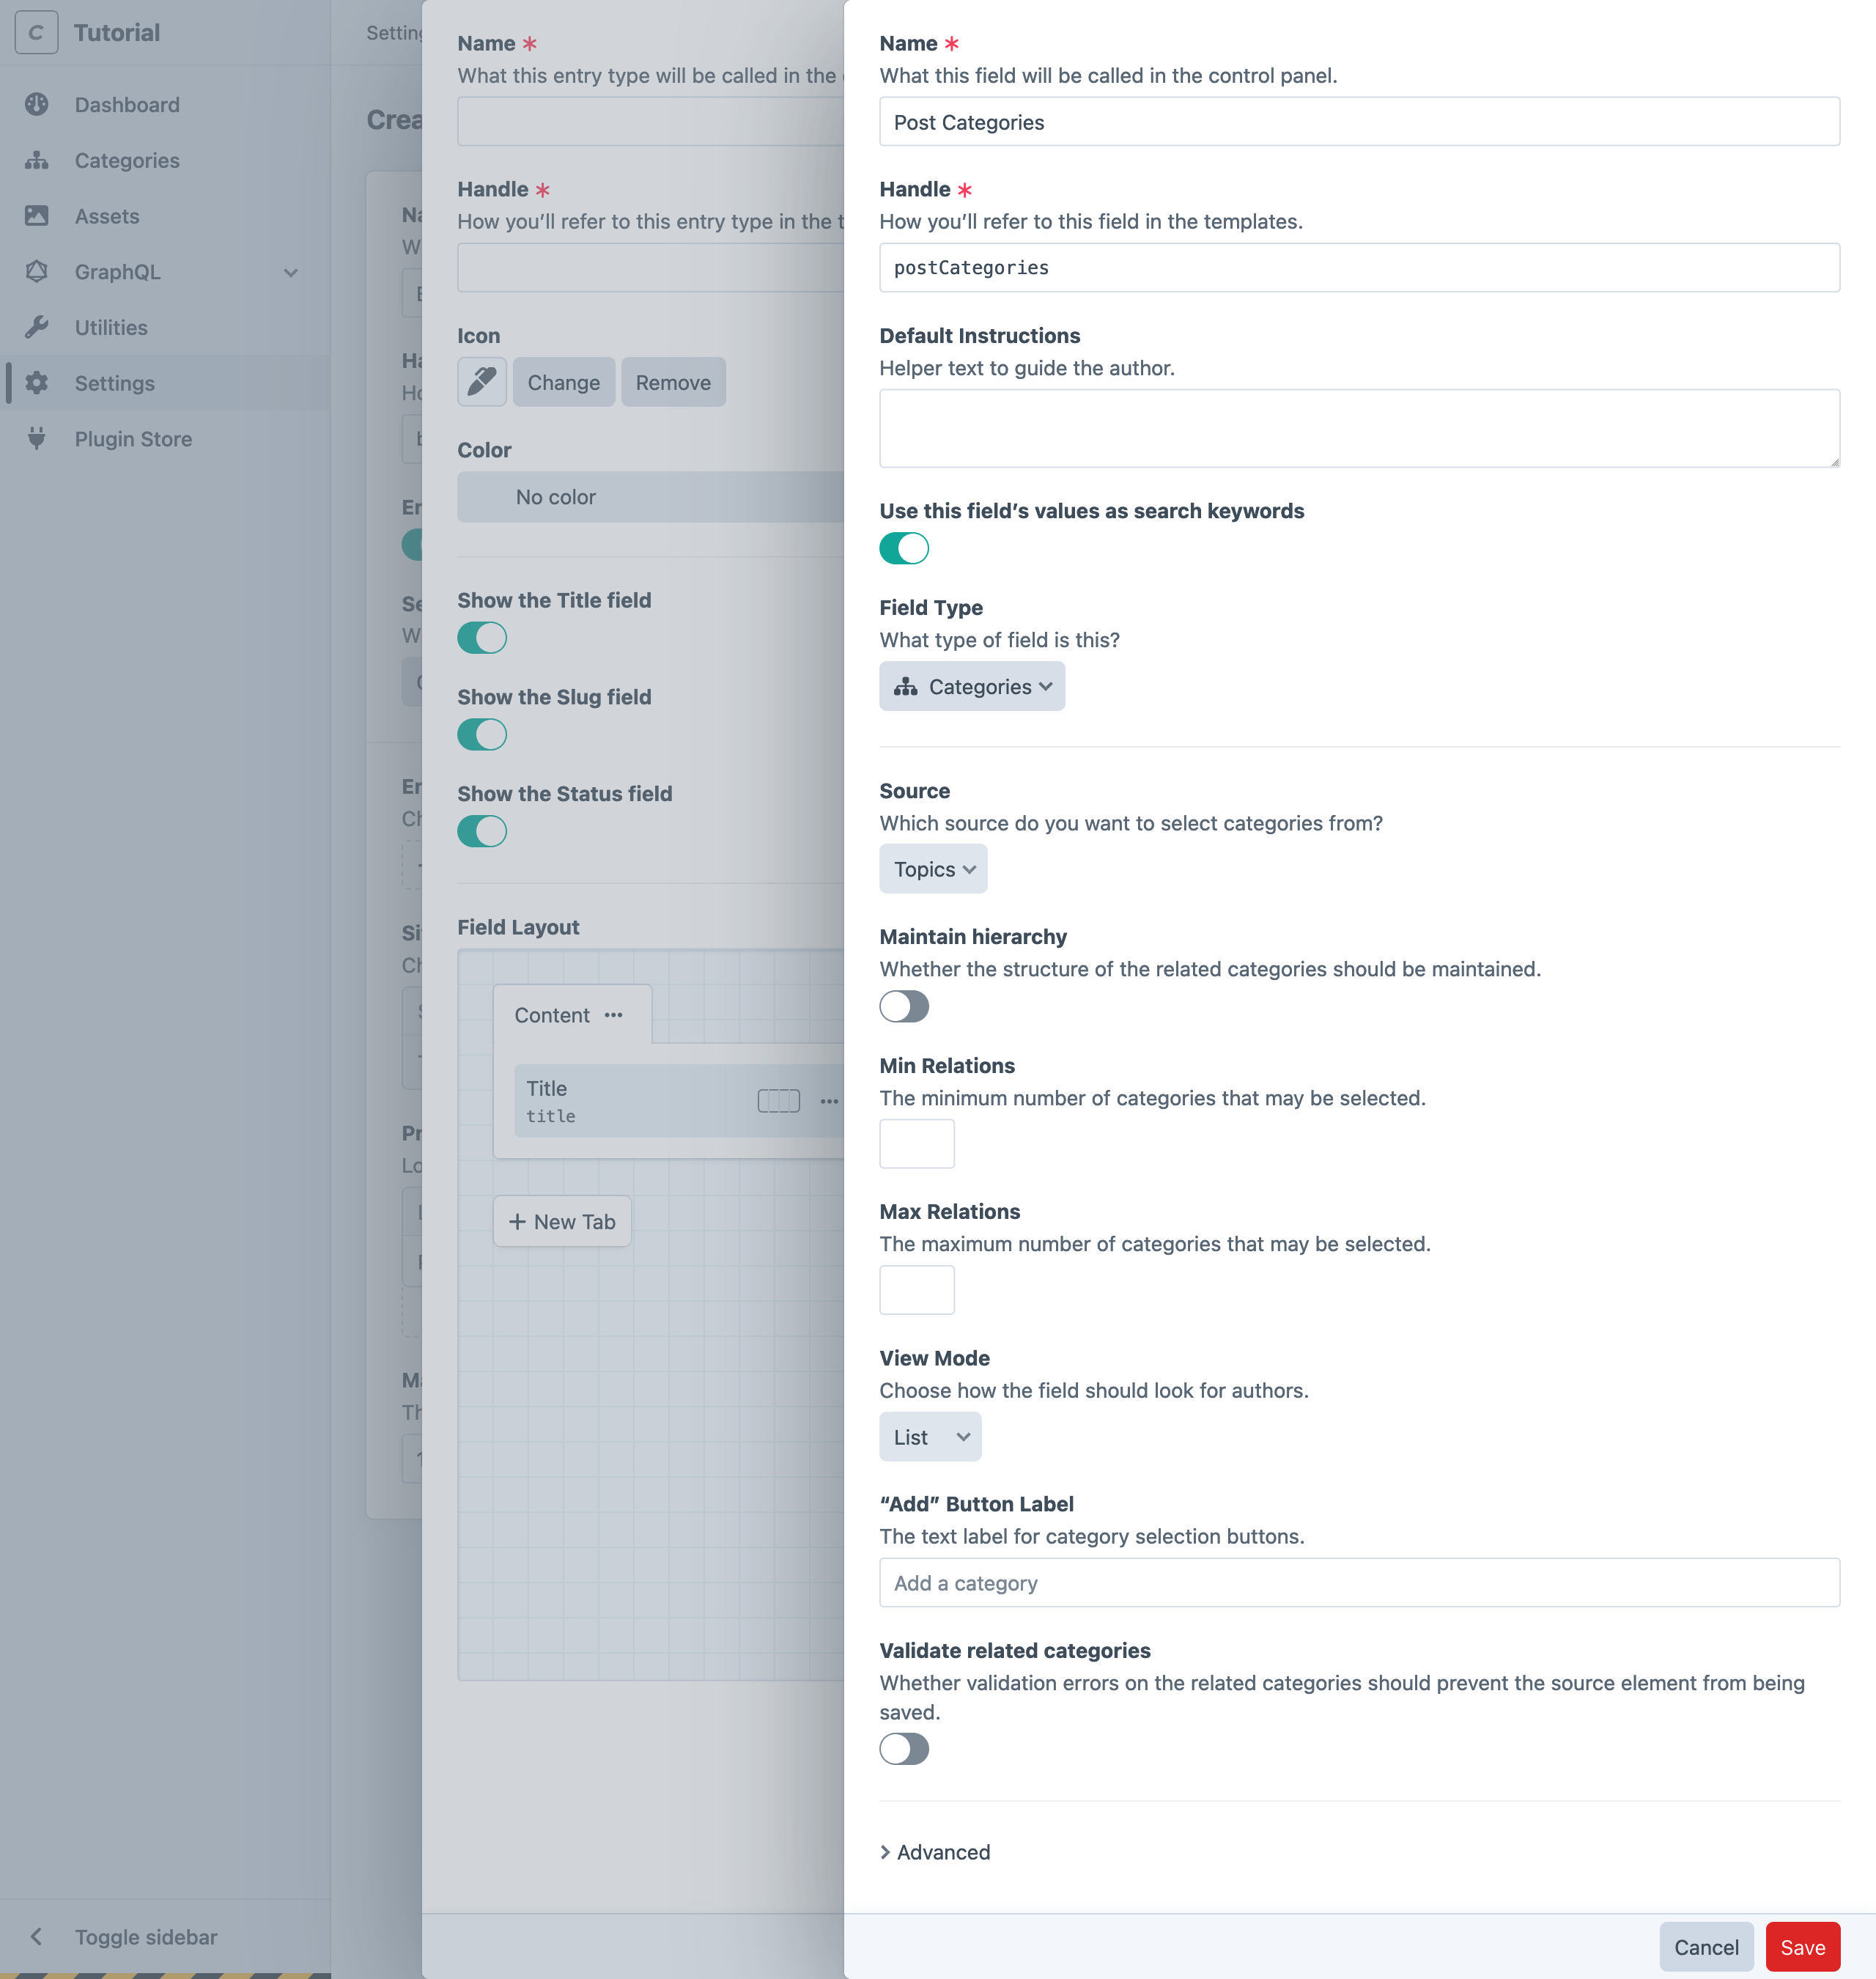
- Enter “Post Categories” into the Name field (and note that Craft automatically generates a Handle of
postCategories); - Choose “Categories” from the Field Type menu—the rest of the page will be updated with options specific to categories fields;
- Choose “Topics” from the Source menu (it will probably be selected, already);
- Save the field.
Previously, we only created the category group. This step creates a field that will allow us to select from that pool of content. Craft separates these concerns so that you may establish relationships between elements in different parts of your site, without needing to duplicate content on either end of the relationship.
For example, if we later added a Galleries section, you could assign this categories field (or create another one) to that volume’s field layout, while pulling from the same pool of topics!
With the field created, drag it into the Post entry type’s field layout. This one is specific enough to the context that we don’t need to override any instance settings!
#Post Content
Our posts’ content will be authored with Craft’s Matrix field type. Matrix fields are inherently a bit more complex than other field types, because they manage nested entries rather than single, “scalar” values like text or numbers. The good news is that the process of defining the entry types available within a Matrix field is identical to what we’ve done, so far!
Back on our Post entry type slideout, click + New field:
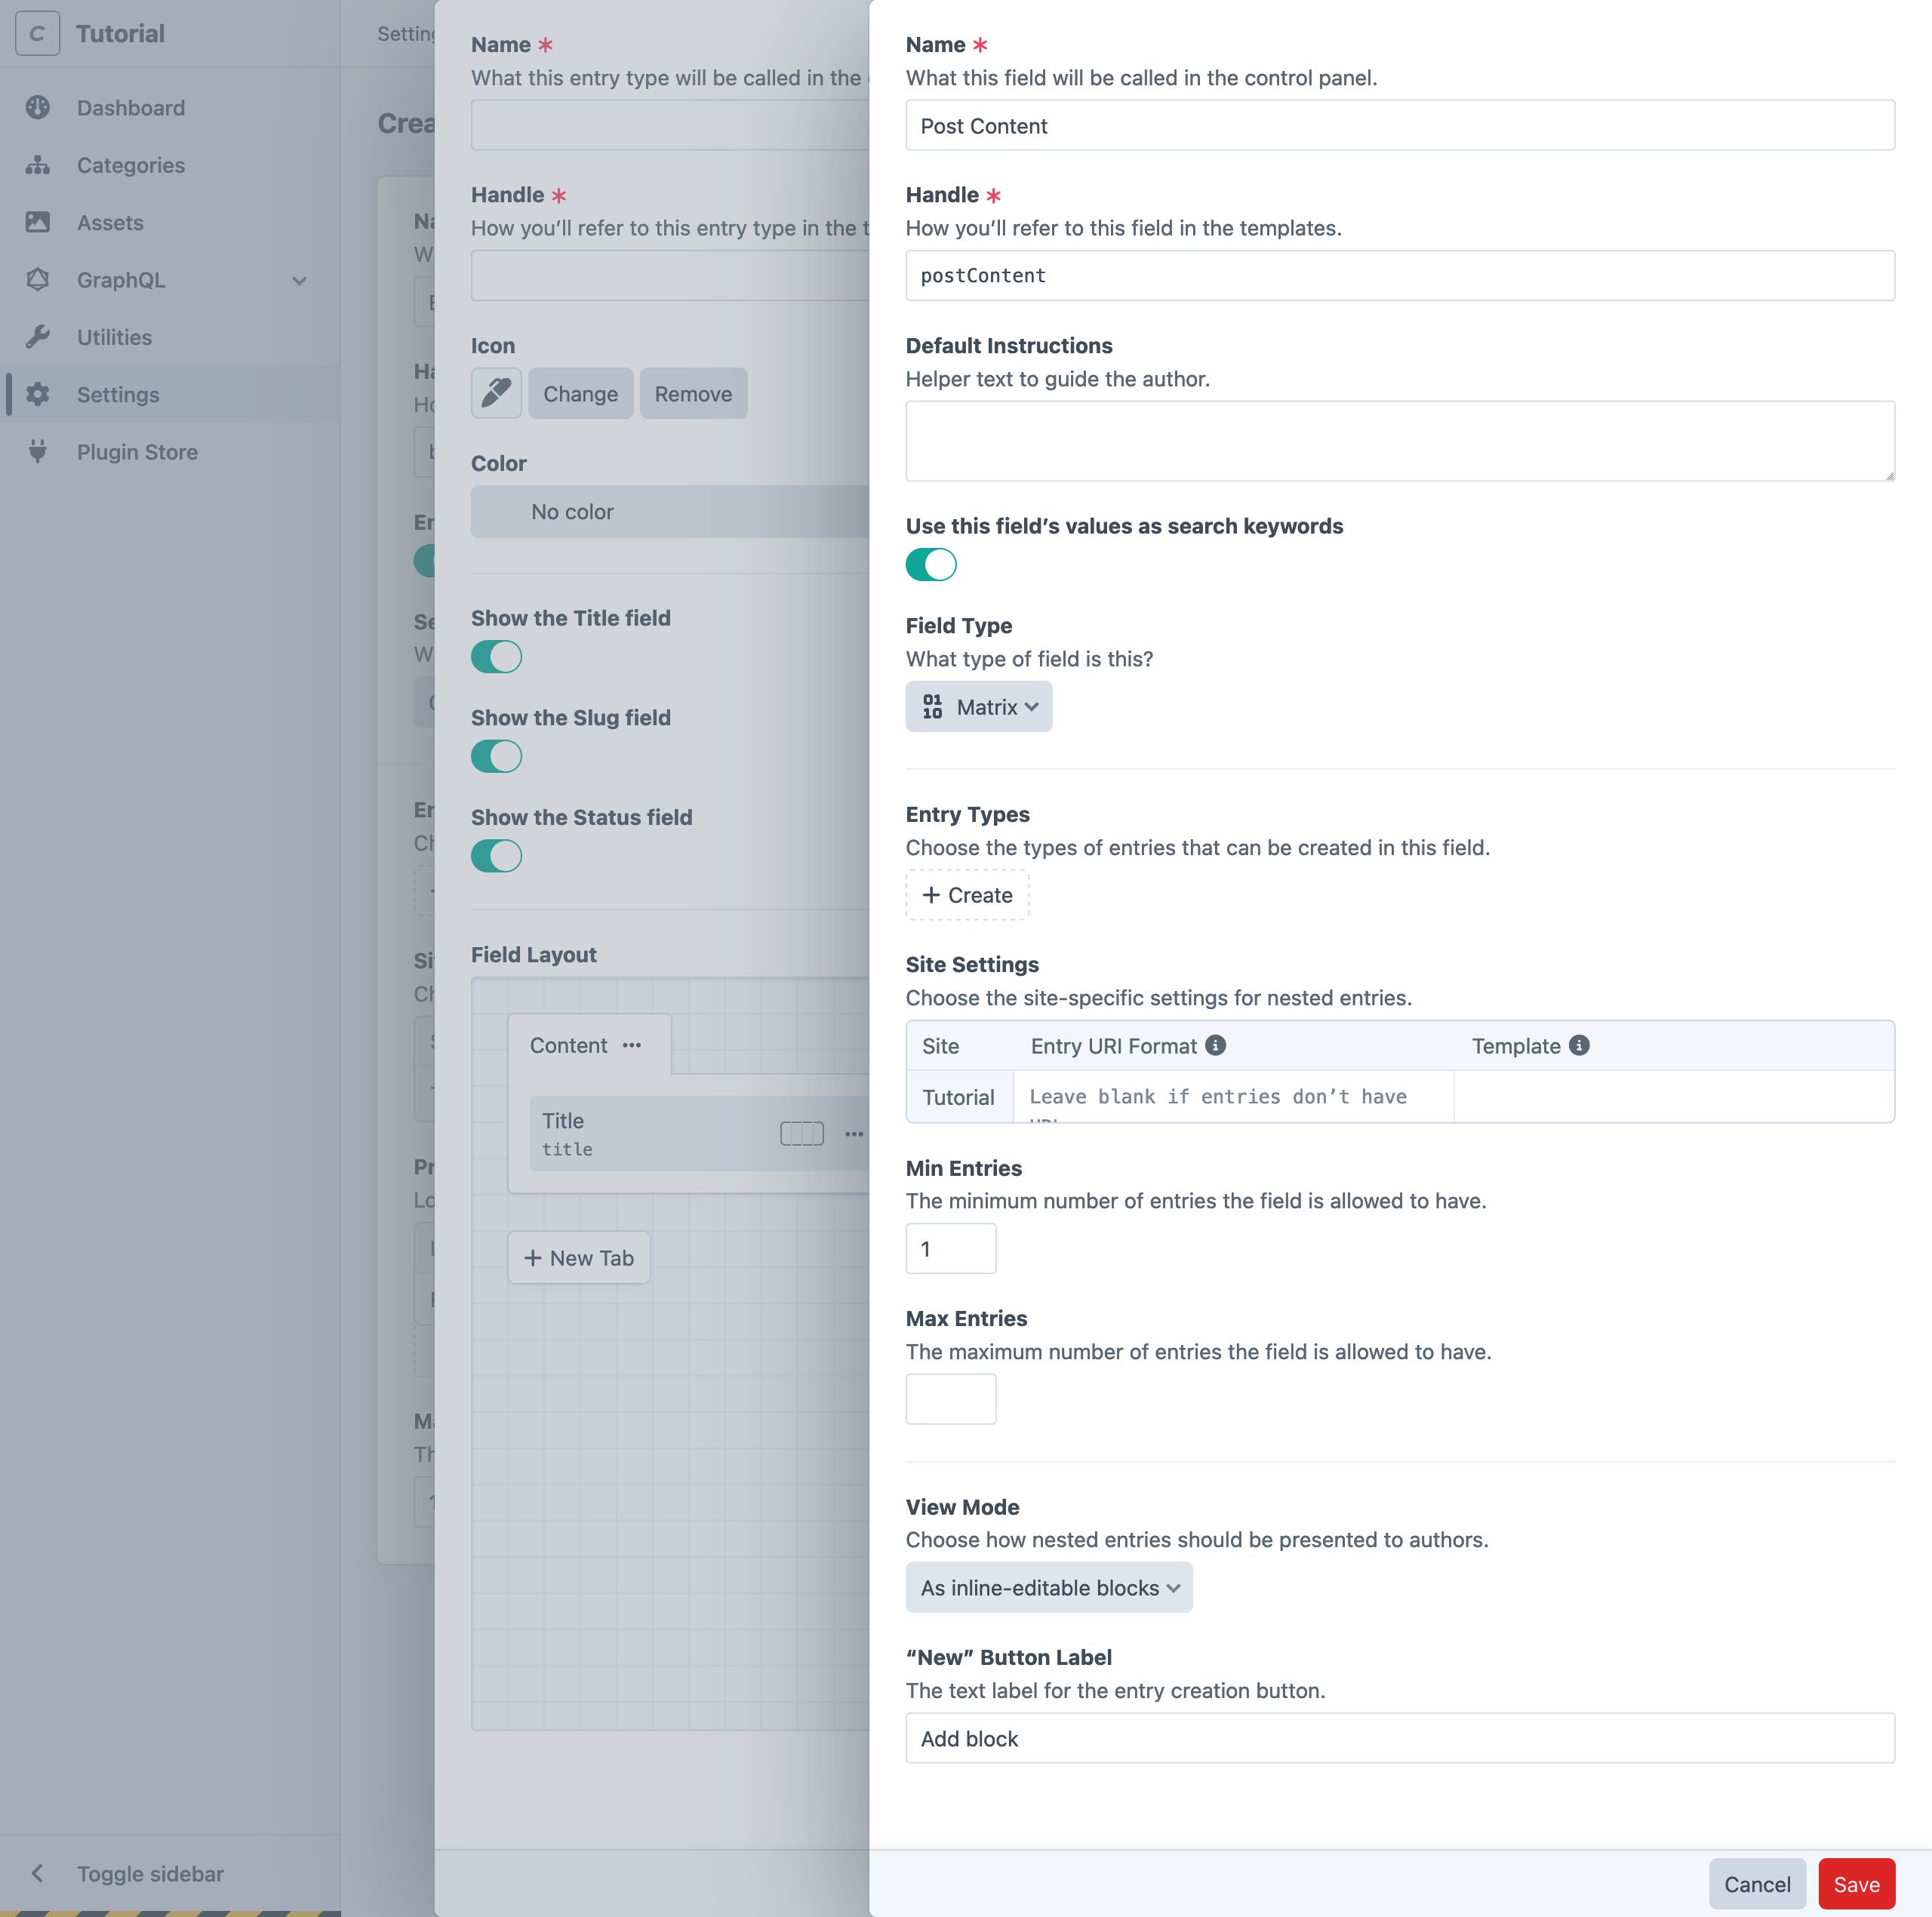
- Enter “Post Content” in the Name field (and note that Craft automatically generates a Handle of
postContent); - Enable Use this field’s values as search keywords ;
- Choose “Matrix” from the Field Type menu—the rest of the page will be updated with options specific to matrix fields;
- Leave the Site Settings fields blank;
- Set the Min Entries field to
1, and leave Max Entries blank; - Choose As inline-editable blocks from the View Mode menu;
- Type “Add block” into the “New” Button Label field;
Now, return to the Entry Types field we skipped—it’s time to define a couple of basic entry types that we’ll use in various combinations while composing content:
#Text Block
The first block will be used for plain text. Click + Create beneath the Entry Types heading in the Matrix field’s settings:
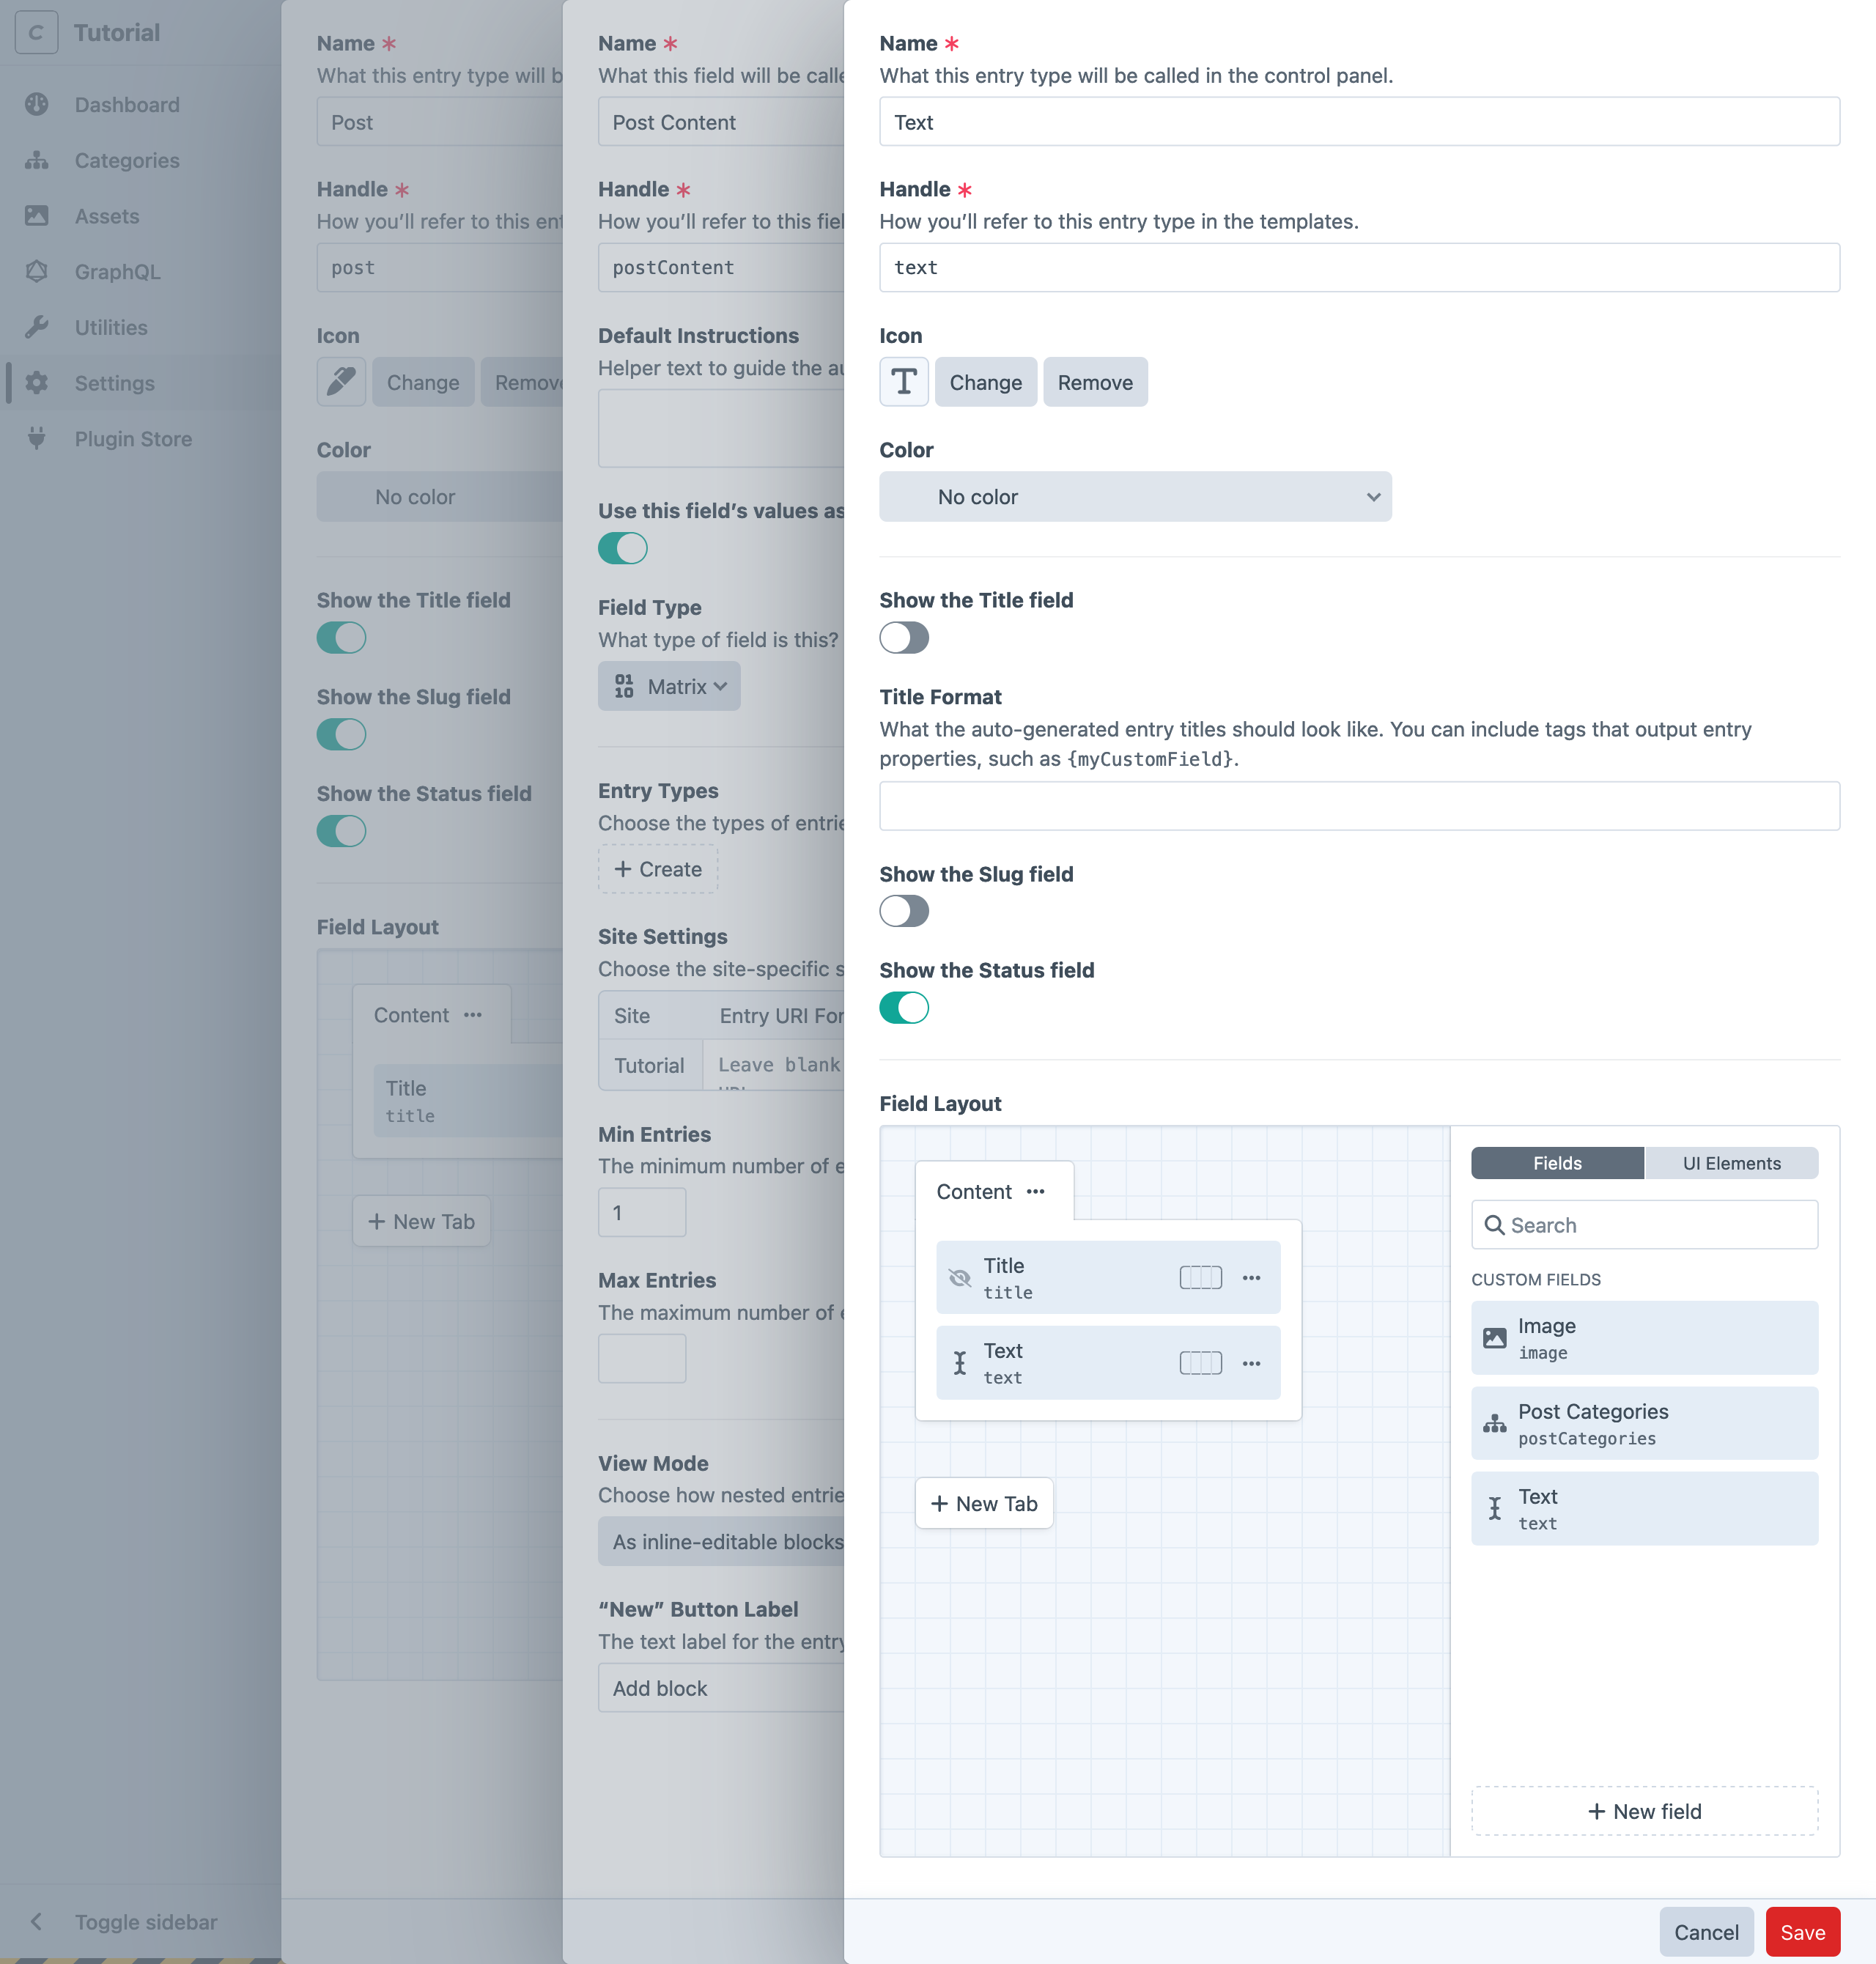
Recall that we made a general-purpose text field for our posts’ Summary, earlier!
- Enter “Text” for the Name and ensure the handle was automatically set to
text; - Pick an Icon and Color (optional—these can help authors identify the nested entry types);
- Turn off Show the Title field and Show the Slug field ;
- Drag the Text (
text) field from the Field Layout designer sidebar into the Content tab ;
Click Save to create the entry type and attach it to the Matrix field. If you chose an icon and color for the entry type, you’ll see it reflected in the Entry Types selector!
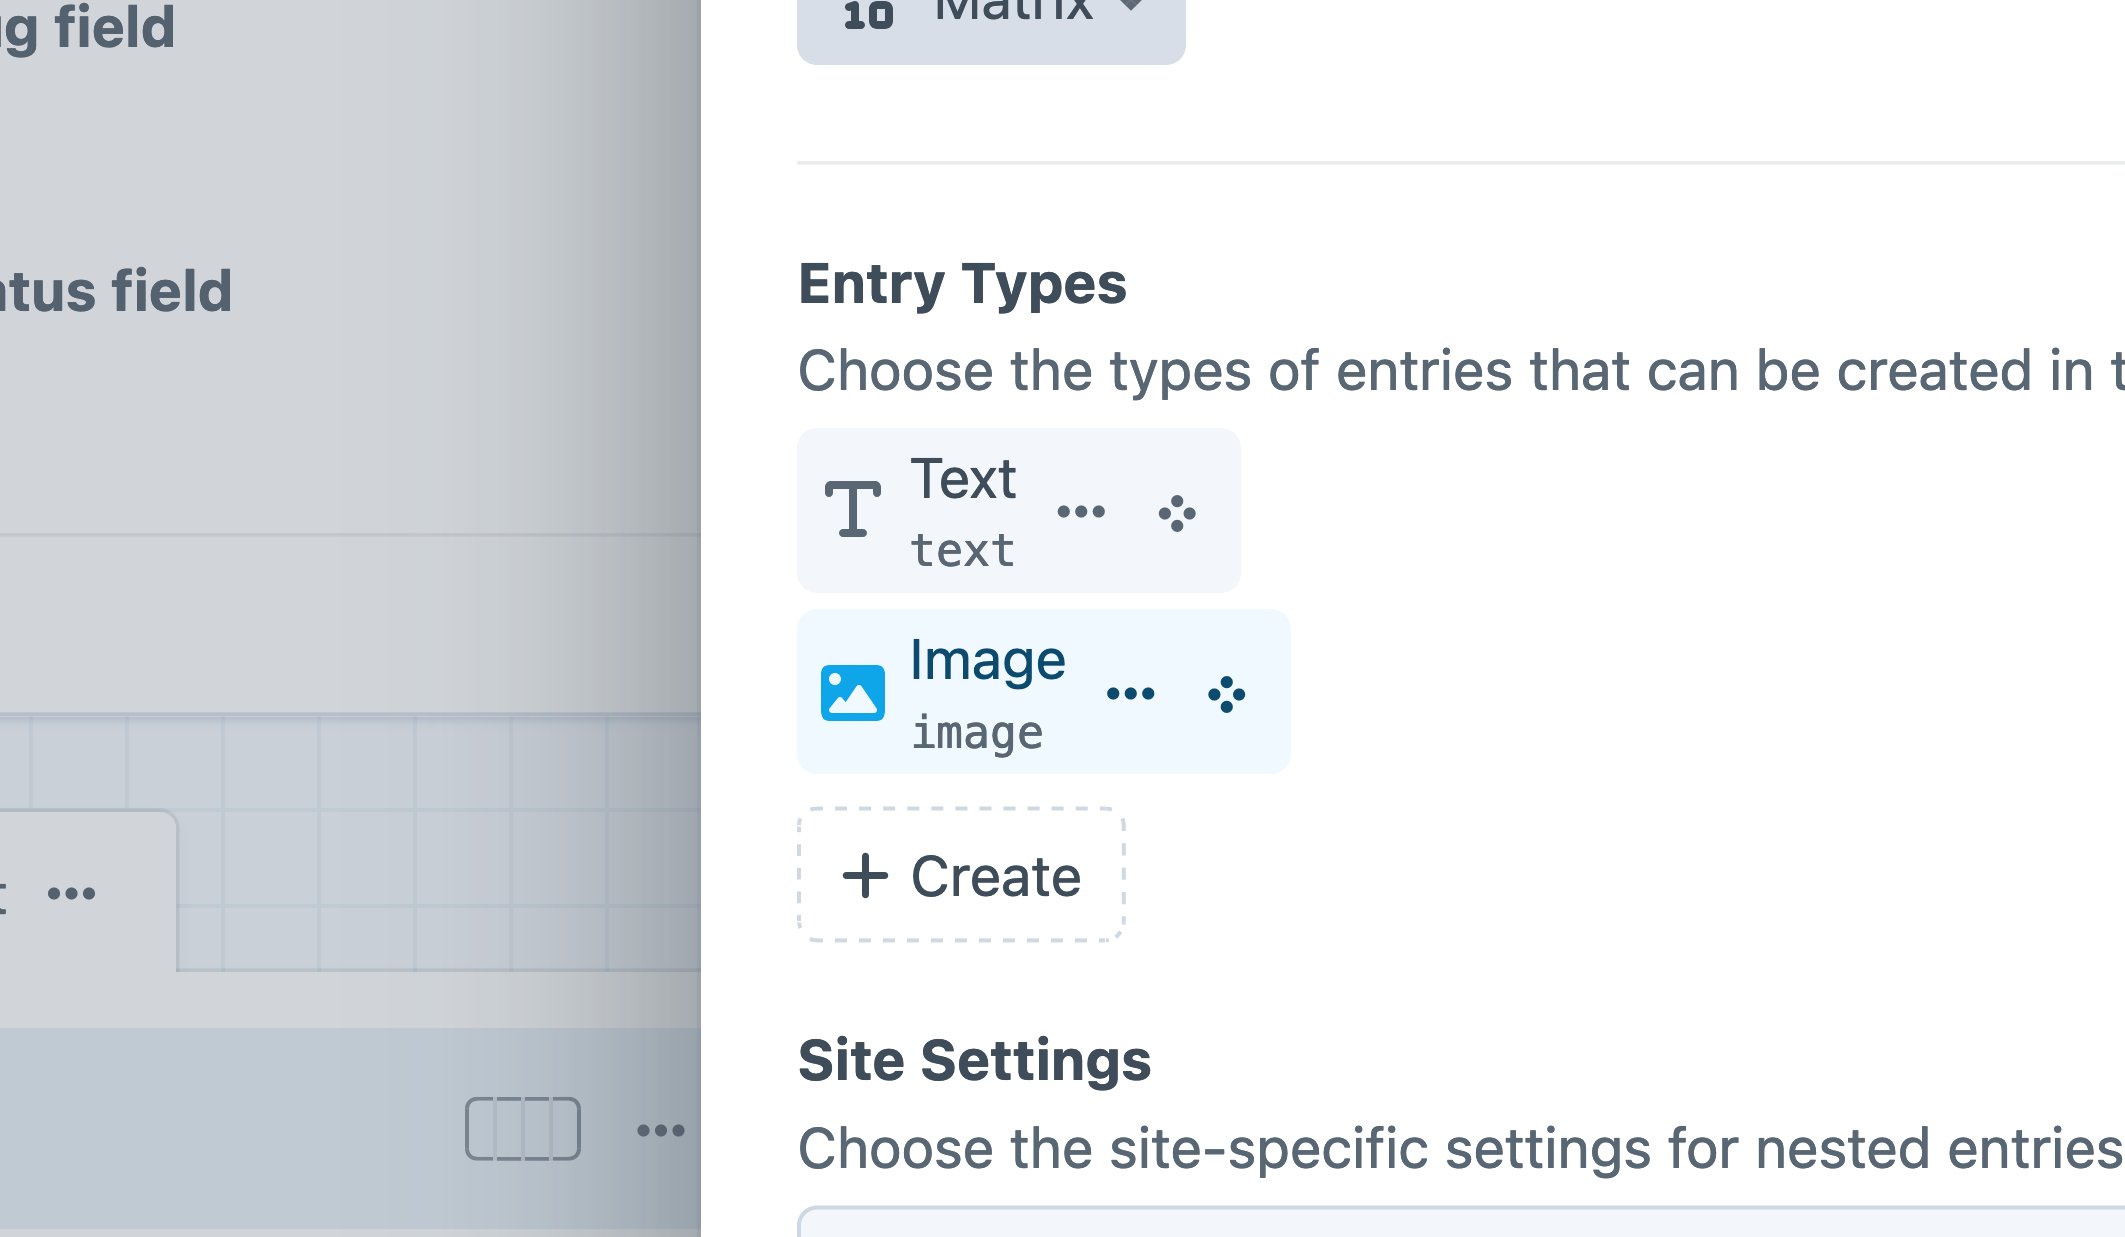
#Image Block
The second block will be used for attaching images. Repeat the process above, but name the entry type “Image” (with a handle of image), and drag the Image field into the Field Layout. Save the entry type to return to your Matrix field settings slideout. You should see two entry types connected to it:
#Finalizing the Field Layout
With the Text and Image entry types created, click Save on the Matrix field. You will be returned to the original Post entry type slideout, with the Post Content Matrix field isolated in its Field Layout sidebar.
Drag that field into the Content tab, then click Save to create the Post entry type! You should now see the Post entry type attached to the Blog section’s Entry Types. One last Save on the Blog section, and you’re done—what a journey!
In the future, you can access all your entry types from
- Settings
- Entry Types
- Settings
- Fields
#Install the CKEditor plugin for rich text fields
If you would prefer to compose the text of your blog posts using a rich text editor (sometimes called a WYSIWYG editor), our first-party CKEditor (opens new window) plugin can be substituted for most any plain text field.
Plugins are installed from the control panel (click Plugin Store in the main navigation and search for “CKEditor”), or via the command line:
- Run
ddev composer require craftcms/ckeditor -wto add the package to your project; - Install the plugin by running
ddev php craft plugin/install ckeditor;
Once installed, you’ll need to create a new field, and replace the field in our Text entry type:
- Navigate to
- Settings
- Entry Types
- Remove the Text field from the field layout by dragging it into the sidebar, or using the action menu and selecting Remove;
- Click + New field in the field layout designer sidebar;
- Give the field a Name and Handle that make sense, like “Rich Text” and
richText, respectively; - Define a reusable configuration (opens new window);
- Save the field;
- Drag the new Rich Text field into your layout;
- Save the field layout;
That’s it! Plain text fields can be migrated to CKEditor without losing data—but some field types are not compatible with one another! Craft puts a ⚠️ next to any options in the Field Type menu that can’t be automatically converted.
Switching the existing plain text field to CKEditor means that all instances of that field would be updated. This may not be appropriate for our Summary field (or additional uses, later in the tutorial), so we elected to treat it as a separate base field.
#Advanced Field Layout Customizations
The UI Elements tab in the right sidebar of every field layout designer contains a few tools that can help create richer authoring experiences. Craft comes with tools for splitting up fields, injecting additional instructions, rendering Twig templates, and more.
Here are a few other features of field layouts worth experimenting with:
- Widths: By default, fields occupy the full width of the element editor. Use the column selector UI next to the to set the field as 1/4, 1/2, 3/4, or full-width.
- Line breaks: If a row isn’t full, you can force a field onto the next row with a line break field layout element.
- Field labels: Click the to open a slideout and update a field’s Label. This is particularly useful for the Title field: say you were creating employee profiles, and needed a place for each person’s name and position—the built-in Title field would make more sense being called “Full Name,” while their position could be re-labeled “Position/Title” without creating confusion.
- Required fields: Also within a field’s action menu is an option to mark a field as Required.
- Field conditions and User conditions: Fields can be conditionally included in layouts by setting up condition rules, within the settings slideout. These conditions are evaluated dynamically, and can include rules based on other fields’ values!
#Create a Post
Return to Entries in the main navigation, and click + New entry to create your first blog post. Check it out—all our fields are here, in a gorgeous editing interface!
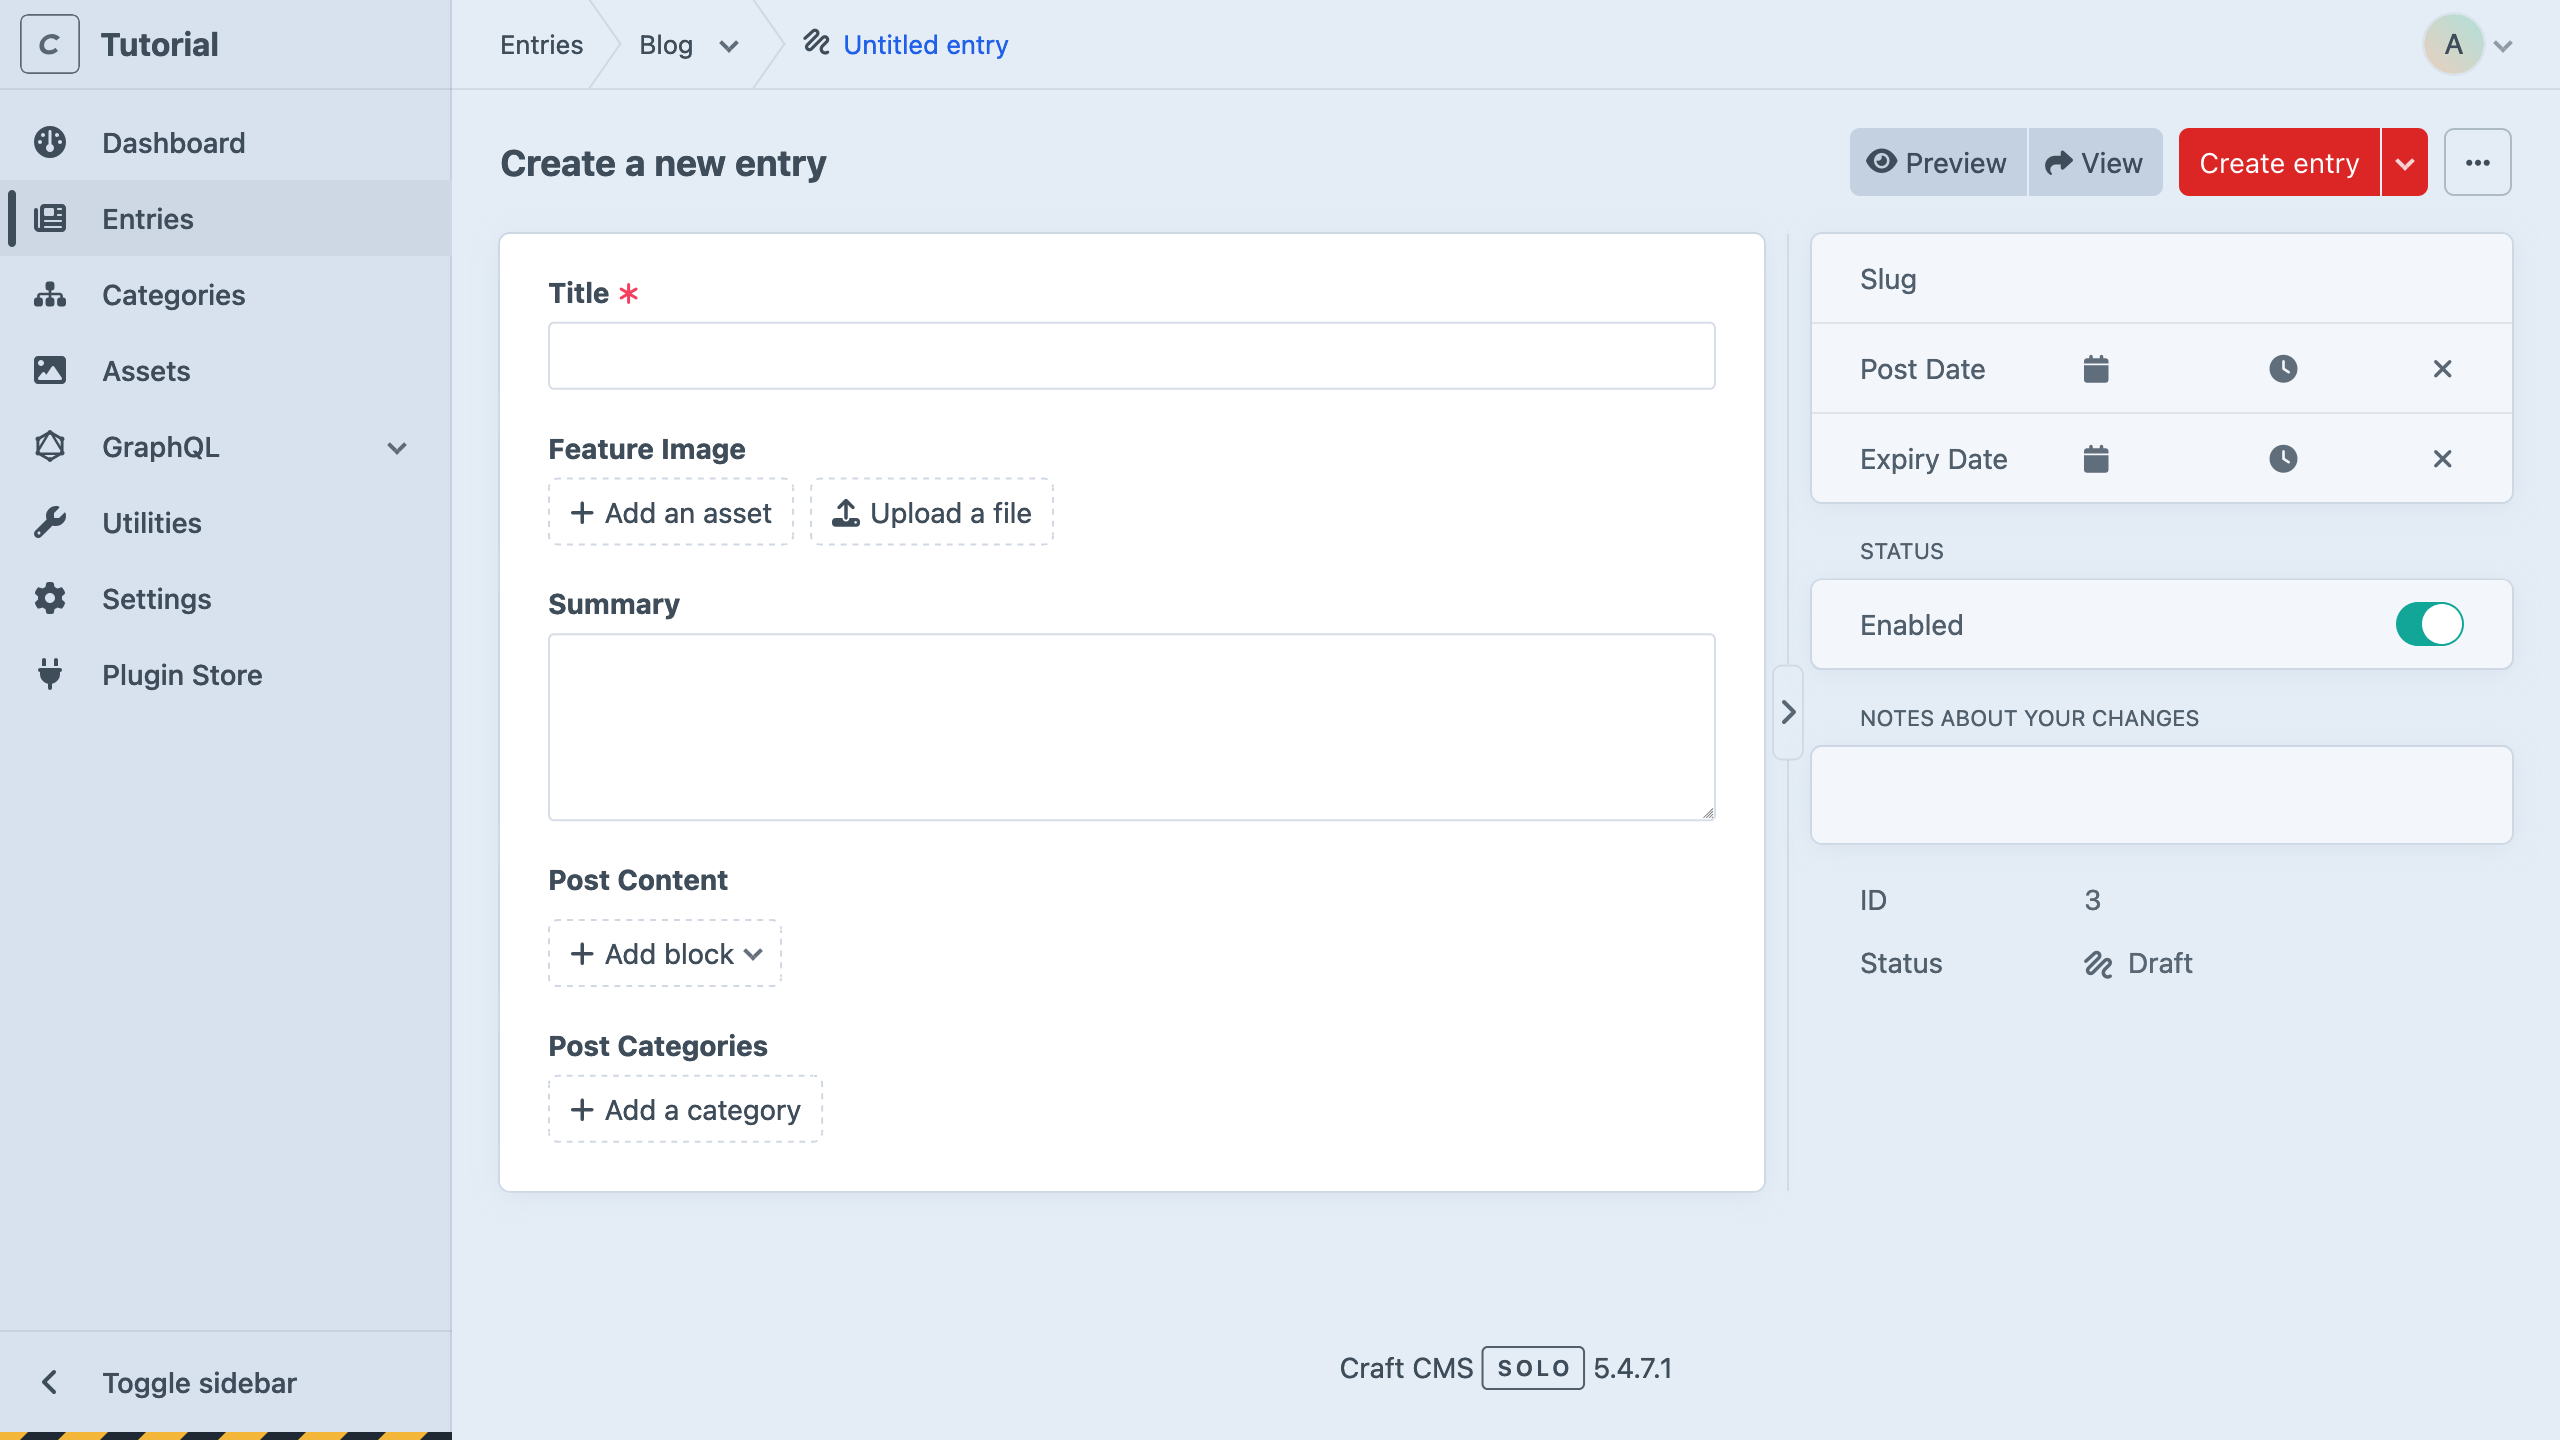
Anything missing? You can always go back to the Post entry type to add, remove, or rearrange fields.
Feel free to play with the content editor on your own—then check back in so we can go over a couple features you’ll need to be aware of before building out the front-end.