Cart
Commerce represents a customer’s cart with the same object as a completed order, which means working with data before and after checkout is familiar.
The snippets on this page are simplified versions of concepts illustrated in our example templates.
This page covers common patterns for working with carts in the front-end, prior to checkout:
- Accessing the cart and its contents
- Displaying a cart’s contents
- Adding items to a cart
- Working with line items
- Using custom fields
- Loading and forgetting carts
#Accessing the Cart
A customer’s cart is always available via the carts service:
{% set cart = craft.commerce.carts.cart %}
Carts are also available to headless or hybrid front-ends, via Ajax:
fetch('/actions/commerce/cart/get-cart', {
  headers: {
    'Accept': 'application/json',
  },
})
  .then(r => r.json())
  .then(console.log);

// -> { cart: { ... } }
The path of this Ajax request is significant when working with multiple sites and stores! To fetch a store-specific cart, you can either…
- …prefix the action path with your site’s base URI;
- …set the
X-Craft-Siteheader to the ID or handle of the desired site;
Either of the examples above will generate a new cart number if one is not already present in the session. The cart may exist only in-memory, until a customer interacts with it in some way (typically by adding an item, but also saving a custom field, setting their email, adding an address, etc…).
If you do need a cart to be persisted for every visitor, you can force Commerce to save it by passing true:
{# Get a cart and ensure it’s persisted: #}
{% set cart = craft.commerce.carts.cart(true) %}
This is generally not necessary, and can have significant performance impacts on high-traffic stores.
To see what cart information you can use in your templates, take a look at the Order (opens new window) class reference. You can also refer to the example templates’ shop/cart/index.twig (opens new window) file.
Once a cart is completed and becomes an order, accessing the current cart via either method starts this process over.
#Displaying Cart Contents
Your store should provide enough information about the contents of a customer’s cart for them to shop and check out confidently.
#Quantity and Totals
To display the number of items in the customer’s cart, use its totalQty attribute:
There are {{ cart.totalQty }} item(s) in your cart!
A variety of totals can also be displayed:
Cart ({{ cart.itemSubtotal|commerceCurrency }})
Craft includes a powerful internationalization engine (opens new window) that can automatically pluralize the awkward item(s) message above:
{{ 'You have {num,plural,=0{nothing} =1{one item} other{# items}} in your cart'|t('site', {
  num: cart.totalQty
}) }}
#Line Items
A cart’s contents are represented by line items. Line items are typically populated and refreshed from purchasables when they are added to the cart, but custom line items can also be created on-the-fly. 5.1.0+
Out-of-the-box, most line items represent a variant, and have a quantity, description, notes, a calculated subtotal, options, adjustments (like tax and shipping costs), and other metadata. Most importantly, though, the line item retains a reference to its purchasable so that it can be refreshed with the latest information from your store while the customer is shopping. Donations are also added to the cart as line items.
In the event a product or variant is altered or deleted after a customer checks out, enough information is memoized on each line item to reconstruct what was purchased, and how much was paid. Some of this is recorded directly on the line item (like prices and its physical attributes), and some is stored as metadata (like options and snapshots).
To learn about working with an active cart, jump to Managing Cart contents.
Line items are always returned as an array, even if there is only a single item in the cart. Loop over them to display information about each one:
<ul>
{% for item in cart.lineItems %}
<li>
<h4>{{ item.description }} (<code>{{ item.sku }}</code>)</h4>
<p>{{ item.price|commerceCurrency }} × {{ item.qty }} → {{ item.subtotal|commerceCurrency }}</p>
</li>
{% endfor %}
</ul>
You can get a line item’s source purchasable (most often a variant) by calling item.purchasable, and the product a variant belongs to via item.purchasable.product or item.purchasable.owner.
Let’s take a closer look at some other data available via line items.
#Prices
In the example above, we used item.price to display the single-item price. Commerce actually tracks two prices for every line item: a price, and a promotional price. Both prices are resolved via the pricing catalog, but only a synthesized “sale price” is ever used to calculate totals and subtotals.
This gives you flexibility in how prices are structured and advertised, while preserving a tidy, predictable API:
- lineItem.price is the base price as determined by any applicable catalog pricing rules.
- lineItem.promotionalPrice is the promotional price as determined by any applicable catalog pricing rules.
- lineItem.salePrice is the resolved single-quantity price for the item, and is always lower of
priceandpromotionalPrice. - lineItem.subtotal is the product of the line item’s
qtyandsalePrice. - lineItem.adjustmentsTotal is the sum of each of the line item’s adjustment
amountvalues. - lineItem.total is the sum of the line item’s
subtotalandadjustmentsTotal.
You should never perform math on prices directly in your templates. Commerce handles all the necessary calculations in a safe and currency-agnostic way, and provides simple accessors via line item, purchasable, and order objects.
#Physical Properties
Each line item copies its purchasable’s length, width, depth, and weight properties.
#Metadata
Commerce populates line items with a description from its purchasable. Variants use their product type’s configured Order Description Format to render a meaningful string—but you can build a custom description in the template, if you prefer.
Your storefront can also keep arbitrary text under a notes property, or structured data under in the options array. Notes and options are not automatically validated, so your templates should account for a variety of possible values (or the absence thereof):
<ul>
  {% for item in cart.lineItems %}
    {% set purchasable = item.purchasable %}

    <li>
      <h4>{{ item.description }}</h4>

      {# ... #}

      {# Notes: #}
      {% if item.notes is not empty %}
        <p>{{ item.notes }}</p>
      {% endif %}

      {# Options: #}
      {% if item.options is not empty %}
        <dl>
          {% for key, val in item.options %}
            <dt>{{ key|title }}</dt>
            <dd>{{ val }}</dd>
          {% endfor %}
        </dl>
      {% endif %}
    </li>
  {% endfor %}
</ul>
If you are collecting information from customers as they add items to their cart, use the same criteria to output it. For example, “Gift Card” products might ask for a custom message under a giftMessage key—you can then test for the presence of that key, from the cart:
{# ... #}

{# Extra product-type-specific line item data: #}
{% switch item.purchasable.type.handle %}
  {% case 'giftCard' %}
    <p>{{ item.options.giftMessage ?? 'No custom message.' }}</p>
  {% default %}
    {# Fall back to outputting *all* keys: #}
    {% if item.options is not empty %}
      <dl>
        {% for key, val in item.options %}
          <dt>{{ key|title }}</dt>
          <dd>{{ val }}</dd>
        {% endfor %}
      </dl>
    {% endif %}
{% endif %}
This same logic applies when using deeply-nested data—the schema is not automatically enforced by Commerce, so code defensively!
#Notices
Should something about a cart change (like the price of a line item, a total or subtotal, shipping method eligibility, coupon validity, or the availability of a purchasable), Commerce will add a notice to the cart with an explanation of what happened.
You can display notices to the customer by looping over cart.notices:
{% set notices = cart.notices %}

{% if notices %}
  <ul>
    {% for notice in notices %}
      <li class="notice notice--{{ notice.type }}">{{ notice.message }}</li>
    {% endfor %}
  </ul>
{% endfor %}
Each notice has message (a customer-facing description), type (an identifier used to group similar notices), and attribute (the name of the associated attribute) properties. You can fetch notices of a specific type and/or for a specific attribute, if you wish to colocate them with the the relevant UI:
{% set cart = craft.commerce.carts.cart %}

<form method="post">
  {{ csrfInput() }}
  {{ actionInput('commerce/cart/update-cart') }}

  {% set couponNotices = cart.getNotices(attribute = 'couponCode') %}

  {% if couponNotices is not empty %}
    <ul>
      {% for notice in couponNotices %}
        <li>{{ notice.message }}</li>
      {% endfor %}
    </ul>
  {% endif %}

  <label>
    <span>Coupon Code</span>
    <input
      type="text"
      name="couponCode"
      value="{{ cart.couponCode }}">
  </label>
</form>
The getNotices() method accepts type and attribute arguments to make filtering notices easier. You can also filter a collection of notices after fetching them:
{% set notices = cart.getNotices() %}

{% for notice in notices|filter(n => n.type == 'invalidCouponRemoved') %}
  {{ notice.message }}
{% endfor %}
Notices may apply to an attribute of the cart, or an individual line item; the attribute in the latter case will contain the item’s ID and property:
lineItem.{id}.{property}
To access notices specific to a line item in-context, filter them down based on the attribute:
{% for item in cart.lineItems %}
  {# ... #}
  {% set itemNotices = cart.notices|filter(n => n.attribute starts with "lineItems.#{item.id}") %}

  {% for itemNotice in itemNotices %}
    {{ itemNotice.message }}
  {% endfor %}
{% endfor %}
#Clearing Notices
To clear notices, send a POST request to the commerce/cart/update-cart action with any value in the clearNotices param:
<form method="post">
  {{ csrfInput() }}
  {{ actionInput('commerce/cart/update-cart') }}
  {{ hiddenInput('clearNotices', 'Yes, please!') }}

  <button>Clear all notices</button>
</form>
Call craft\commerce\elements\Order::clearNotices() (opens new window) directly to clear notices by type and/or attribute:
{# Clear notices on the `couponCode` attribute: #}
{% do cart.clearNotices(null, 'couponCode') %}
use craft\commerce\Plugin as Commerce;

// Get the current cart
$cart = Commerce::getInstance()->getCarts()->getCart();

// Clear notices on the `couponCode` attribute
$cart->clearNotices(null, 'couponCode');
Be aware that this only removes the notices from the cart object in memory. Save the cart to scrub them from the database, as well:
{# Save the cart #}
{% do craft.app.elements.saveElement(cart) %}
// Save the cart
Craft::$app->getElements()->saveElement($cart);
This is best handled via a controller action in a module or plugin—rendering Twig templates should generally not have side effects.
Notices may be re-added to a cart any time its contents change or prices are recalculated!
#Managing Cart Contents
Cart contents are typically updated via HTML forms, but Commerce also supports JSON payloads over Ajax, for headless and hybrid storefronts.
#Adding Items
To add an item to the cart, send a purchasableId the commerce/cart/update-cart action:
<form method="post">
  {{ csrfInput() }}
  {{ actionInput('commerce/cart/update-cart') }}

  <select name="purchasableId">
    {% for variant in product.variants %}
      <option value="{{ variant.id }}">{{ variant.sku }}</option>
    {% endfor %}
  </select>

  <button>Add item</button>
</form>
You can add multiple items in a single request under a purchasables[] param:
{# Load items from a “Variants” relational field: #}
{% set relatedItems = entry.featuredItems.all() %}

<h3>Shop this look!</h3>

<form method="post">
  <ul>
    {% for item in relatedItems %}
      <li>
        <label>
          <input
            type="checkbox"
            name="purchasables[{{ loop.index }}][id]"
            value="{{ item.id }}"
            checked />
            <span>{{ purchasable.title }}</span>
        </label>
      </li>
    {% endfor %}
  </ul>

  <button>Add item(s) to cart</button>
</form>
Each element in the purchasables[] array must have an id key, and may contain additional fields for quantity and other metadata.
If the inputs for each purchasable are not adjacent in the DOM, a unique index key is required to preserve their grouping—in this example we’ve used {{ loop.index }} as a temporary identifier.
#Setting Quantity
When adding a purchasable to the cart, provide a qty param to let the customer choose how many they want. Expanding on our single-item form in the previous section…
<form method="post">
  {{ csrfInput() }}
  {{ actionInput('commerce/cart/update-cart') }}

  <select name="purchasableId">
    {% for variant in product.variants %}
      <option value="{{ variant.id }}">{{ variant.sku }}</option>
    {% endfor %}
  </select>

  <input
    type="number"
    name="qty"
    value="1"
    step="1"
    min="1">

  <button>Add to cart</button>
</form>
Within our multi-item form example, use an input named purchasables[{{ loop.index }}][qty] (alongside purchasables[{{ loop.index }}][id]) to send a quantity param for each item. This allows you to build advanced, single-page order forms popular in B2B or wholesale storefronts.
If a compatible line item is already in the cart, that number of items will be added to it.
To directly update the quantity of an existing line item, see the Updating Line Items section.
#Line Item Options and Notes
An options parameter can be submitted with arbitrary data to include with that item. A note parameter can include a message from the customer.
In this example, we’re providing the customer with an option to include a note, preset engraving message, and gift-wrap option:
{% set product = craft.products().one() %}
{% set variant = product.defaultVariant %}

<form method="post">
  {{ csrfInput() }}
  {{ actionInput('commerce/cart/update-cart') }}
  {{ hiddenInput('qty', 1) }}
  <input type="text" name="note" value="">
  <select name="options[engraving]">
    <option value="happy-birthday">Happy Birthday</option>
    <option value="good-riddance">Good Riddance</option>
  </select>
  <select name="options[giftwrap]">
    <option value="yes">Yes Please</option>
    <option value="no">No Thanks</option>
  </select>
  {{ hiddenInput('purchasableId', variant.id) }}
  <button>Add to Cart</button>
</form>
{% set product = craft.products().one() %}

<form method="post">
  {{ csrfInput() }}
  {{ actionInput('commerce/cart/update-cart') }}
  {% for variant in product.variants %}
    {{ hiddenInput('purchasables[][id]', variant.id) }}
    {{ hiddenInput('purchasables[][qty]', 1) }}
    <input type="text" name="purchasables[][note]" value="">
    <select name="purchasables[][options][engraving]">
      <option value="happy-birthday">Happy Birthday</option>
      <option value="good-riddance">Good Riddance</option>
    </select>
    <select name="purchasables[][options][giftwrap]">
      <option value="yes">Yes Please</option>
      <option value="no">No Thanks</option>
    </select>
  {% endfor %}
  <button>Add to Cart</button>
</form>
The same note and options params can be sent when updating a line item, as well!
Commerce does not validate the options and note parameters. If you’d like to limit user input, use front-end validation or use the Model::EVENT_DEFINE_RULES (opens new window) event to add validation rules for the LineItem (opens new window) model.
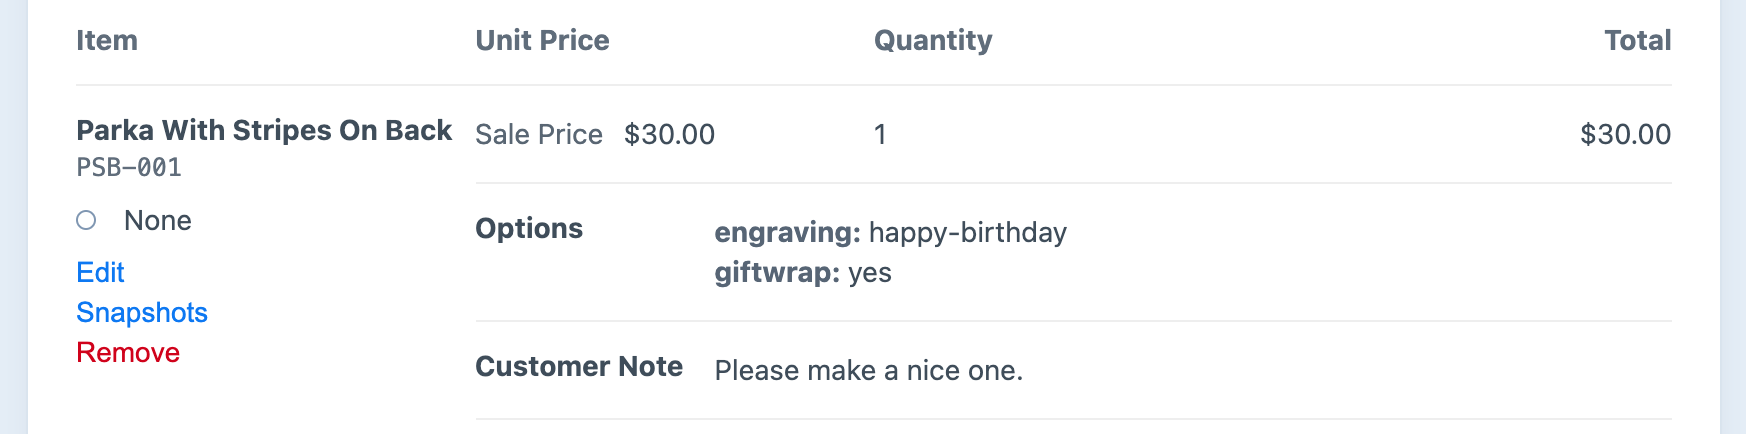
The note and options will be visible on the order’s detail page in the control panel:
#Updating Line Items
The commerce/cart/update-cart endpoint is also used to update existing line items.
To update qty, note, or options for a line item, you must build input name attributes using its existing ID (not the purchasable ID):
{% set cart = craft.commerce.carts.cart %}

<form method="post">
  {{ csrfInput() }}
  {{ actionInput('commerce/cart/update-cart') }}

  {% for item in cart.lineItems %}
    <input type="number" name="lineItems[{{ item.id }}][qty]" min="1" value="{{ item.qty }}">
    <input type="text" name="lineItems[{{ item.id }}][note]" placeholder="My Note" value="{{ item.note }}">
  {% endfor %}

  <button>Update Line Item</button>
</form>
#Removing Line Items
You can remove a line item by sending a remove parameter in the request. This example adds a checkbox the customer can use to remove the line item from the cart:
{% set cart = craft.commerce.carts.cart %}

<form method="post">
  {{ csrfInput() }}
  {{ actionInput('commerce/cart/update-cart') }}

  {% for item in cart.lineItems %}
    <input type="number" name="lineItems[{{ item.id }}][qty]" min="1" value="{{ item.qty }}">
    <input type="text" name="lineItems[{{ item.id }}][note]" placeholder="My Note" value="{{ item.note }}">
    <input type="checkbox" name="lineItems[{{ item.id }}][remove]" value="1"> Remove item<br>
  {% endfor %}

  <button>Update Line Item</button>
</form>
The example templates include a detailed cart template (opens new window) for adding and updating items in a full checkout flow.
#Options Uniqueness
If a purchasable is posted that’s identical to one already in the cart, the relevant line item’s quantity will be incremented by the submitted qty.
If you posted a purchasable or tried to update a line item with different options values, however, a new line item will be created instead. This behavior is consistent whether you’re updating one item at a time or multiple items in a single request.
Each line item’s uniqueness is determined behind the scenes by an optionsSignature attribute, which is a hash of the line item’s options. You can think of each line item as being unique based on a combination of its purchasableId and optionsSignature.
The note parameter is not part of a line item’s uniqueness; it will always be updated on a matching line item.
#Customizing Messages
Any time you submit a request to commerce/cart/update-cart, you can include special successMessage and failMessage params to customize flash messages sent back to the customer. In this example, we are integrating the product type into the confirmation when adding an item to the cart:
<form method="post">
  {{ csrfInput() }}
  {{ actionInput('commerce/cart/update-cart') }}
  {{ successMessageInput("We hope you enjoy your #{product.type.name}!") }}
  {{ failMessageInput("Your #{product.type.name} couldn’t be added to the cart.") }}

  {{ hiddenInput('purchasableId', variant.id) }}

  <button>Buy</button>
</form>
By splitting up cart management into multiple forms, you can provide detailed, personalized messaging for each concern:
<form method="post">
  {{ csrfInput() }}
  {{ actionInput('commerce/cart/update-cart') }}
  {{ successMessageInput('Coupon code applied!') }}

  <label>
    <span>Coupon Code</span>
    <input
      type="text"
      name="couponCode"
      value="{{ cart.couponCode }}" />
  </label>

  <button>Buy</button>
</form>
This kind of atomic update is especially effective in combination with htmx (opens new window) or the Sprig (opens new window) plugin!
#Redirection
Like other forms, Commerce allows you to send users to specific routes after they complete an action—like sending them to their cart after adding an item:
<form method="post">
  {{ csrfInput() }}
  {{ actionInput('commerce/cart/update-cart') }}
  {{ redirectInput('shop/cart') }}

  {# ... #}

  <button>Add to cart</button>
</form>
Read more about the redirectInput() Twig function.
#Loading and Forgetting Carts
“Loading” and “forgetting” are a pair of actions that affect what cart is associated with the customer’s session.
#Load a Cart
Commerce provides a commerce/cart/load-cart endpoint for loading an existing cart into a cookie for the current customer.
You can have the user interact with the endpoint by navigating to a URL or by submitting a form. Either way, an existing cart number is required.
If there are issues loading the cart, an error message will be flashed to the user.
If the desired cart belongs to a user, that user must be logged in to load it into a browser cookie.
The loadCartRedirectUrl setting determines where the customer will be sent by default after the cart has been loaded.
#Loading a Cart with a URL
A customer can load a cart into their session by navigating to a properly constructed action URL.
Store managers can get this URL by navigating in the control panel to
- Commerce
- Orders
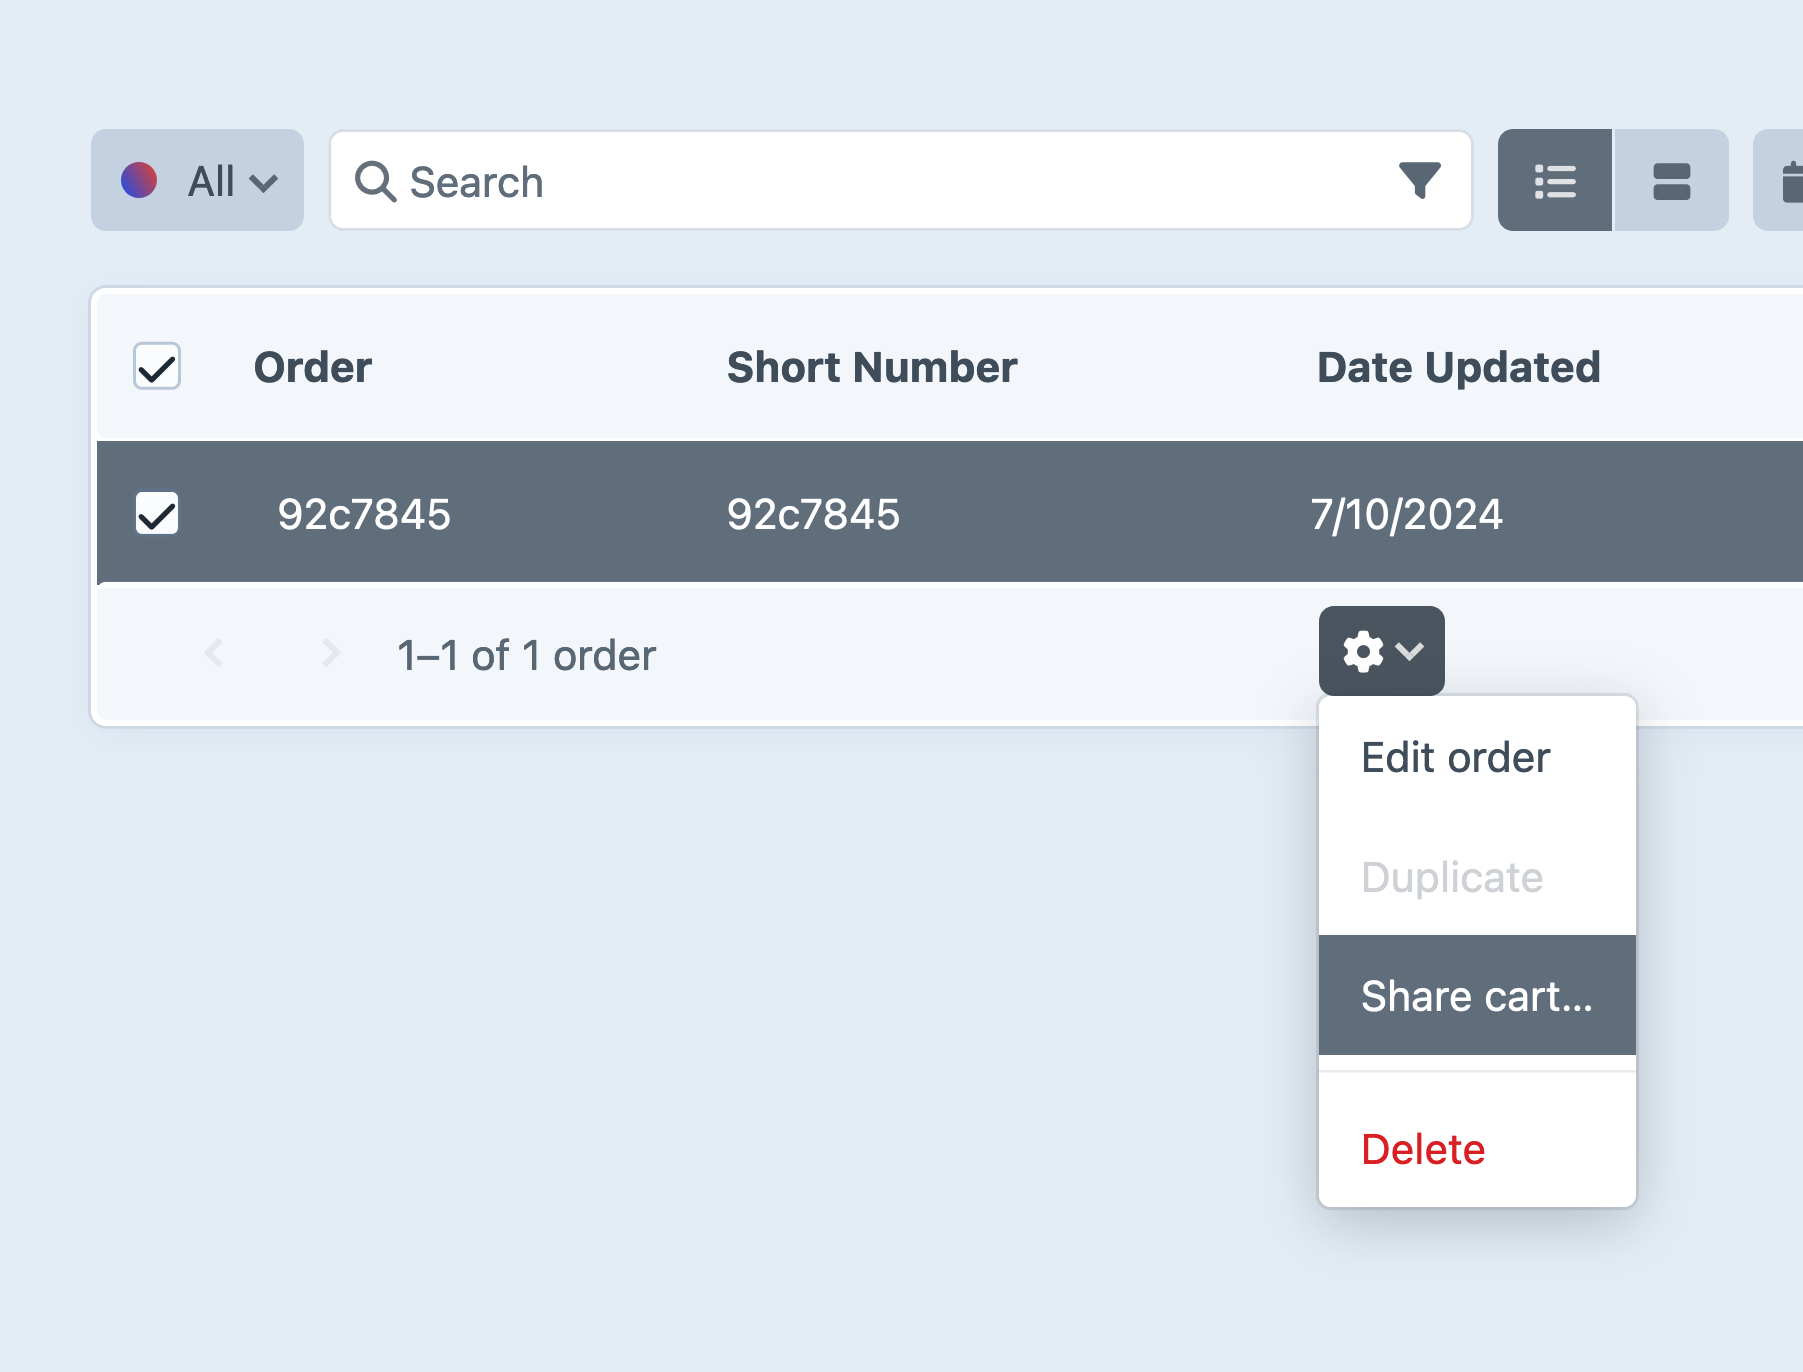
You can also do this from an order edit page by choosing the gear icon and then Share cart….
To do this programmatically (without the involvement of a store manager), you’ll need to create the action URL using the desired cart number.
This example sets a loadCartUrl variable to an absolute URL the customer can access to load their cart. We’re assuming a cart object already exists for the cart that should be loaded:
{% set loadCartUrl = actionUrl(
  'commerce/cart/load-cart',
  { number: cart.number }
) %}
$loadCartUrl = craft\helpers\UrlHelper::actionUrl(
    'commerce/cart/load-cart',
    ['number' => $cart->number]
);
This URL can be presented to the user however you’d like. It’s particularly useful in an email that allows the customer to retrieve an abandoned cart.
#Loading a Cart with a Form
Send a GET or POST action request with a number parameter referencing the cart you’d like to load. When posting the form data, you can include a specific redirect location like you can with most any other Craft form.
This is a simplified version of shop/cart/load.twig (opens new window) from the example templates, which requires the user to provide an existing cart number:
<form method="post">
  {{ csrfInput() }}
  {{ actionInput('commerce/cart/load-cart') }}
  {{ redirectInput('shop/cart') }}

  <input type="text" name="number">
  <button>Submit</button>
</form>
#Restoring Previous Cart Contents
If the customer is a registered user, they may want to continue shopping from another browser or computer. If they have an empty cart on the second device (as they would by default) and they log in, their most recently-created cart will automatically be loaded.
When a guest with an active cart creates an account, that cart will be remain active after logging in.
You can allow a logged-in customer to see their previous (incomplete) carts:
{% if currentUser %}
  {% set currentCart = craft.commerce.carts.cart %}

  {% set oldCartsQuery = craft.orders()
    .isCompleted(false)
    .storeId(currentStore.id)
    .customer(currentUser) %}

  {% if currentCart.id %}
    {# Return all incomplete carts *except* the currently-loaded one: #}
    {% do oldCartsQuery.id(['not', currentCart.id]) %}
  {% endif %}

  {% set oldCarts = oldCartsQuery.all() %}

  {# ... #}
{% endif %}
use craft\commerce\Plugin as Commerce;
use craft\commerce\elements\Order;

$currentUser = Craft::$app->getUser()->getIdentity();

if ($currentUser) {
    $currentCart = Commerce::getInstance()->getCarts()->getCart();

    $oldCartsQuery = Order::find()
        ->storeId(Commerce::getInstance()->getStores()->getCurrentStore())
        ->isCompleted(false)
        ->user($currentUser);

    if ($currentCart->id) {
        // Return all incomplete carts *except* the currently-loaded one:
        $oldCartsQuery->id('not '.$currentCart->id);
    }

    $oldCarts = $oldCartsQuery->all();
}
With that list of carts, you can build a form to switch between multiple carts:
<form method="post">
  {{ csrfInput() }}
  {{ actionInput('commerce/cart/load-cart') }}
  {{ redirectInput('cart') }}

  <select name="number">
    {% for oldCart in oldCarts %}
      <option value="{{ oldCart.number }}">
        {{ oldCart.shortNumber }}
        ({{ oldCart.totalQty }} items, last updated {{ oldCart.dateUpdated.format('F j, Y') }})
      </option>
    {% endfor %}
  </select>

  <button>Switch</button>
</form>
…or loop over only the line items in those older carts to allow the customer to merge them to their current cart:
<h2>Previous Cart Items</h2>

<form method="post">
  {{ csrfInput() }}
  {{ actionInput('commerce/cart/update-cart') }}

  {% for oldCart in oldCarts %}
    {% for lineItem in oldCart.lineItems %}
      {{ lineItem.description }}
      <label>
        {{ input('checkbox', 'purchasables[][id]', lineItem.purchasableId) }}
        Add
      </label>
    {% endfor %}
  {% endfor %}

  <button>Merge items</button>
</form>
While Commerce combines similar line items in the active cart, this simple form may list the same purchasable more than once.
#Forgetting a Cart
A logged-in customer’s cart is stored in a cookie that persists across sessions, so they can close their browser and return to the store without losing their cart. If the customer logs out, Commerce assigns the “guest” a new cart.
Removing all the items from a cart doesn’t mean that the cart is forgotten, though—sometimes, fully detaching a cart from the session is preferable to emptying it. To remove a cart from the customer’s session (without logging out or clearing the items), make a POST request to the cart/forget-cart action. A cart number is not required—Commerce can only detach the customer’s current cart.
<form method="post">
  {{ csrfInput() }}
  {{ actionInput('commerce/cart/forget-cart') }}
  {{ redirectInput('shop/cart') }}

  <button>Forget this cart</button>
</form>
The next time the customer’s cart is accessed, Commerce will generate a new cart number and attach it to their session; as soon as they make a request to the update-cart action, the cart will be saved.
The only way to recover a guest’s cart is with the involvement of a store manager, via the control panel. If the customer has entered addresses or populated custom fields, they will not be able to retrieve that information after forgetting their cart, unless they recorded the cart number and your shop provides a method for loading the cart back into their session.
#Custom Fields
Like any other type of element, orders can have custom fields associated with them via a field layout. To customize the fields available on carts and orders, visit
- Commerce
- System Settings
- Orders
- Field Layout
Custom fields are perfect for storing information about an order that falls outside line item options or notes.
Now that Addresses are stored as elements, they support custom fields, too!
You can update custom fields on a cart by posting data to the commerce/cart/update-cart action under a fields key:
<form method="post">
  {{ csrfInput() }}
  {{ actionInput('commerce/cart/update-cart') }}
  {{ redirectInput('shop/cart') }}

  <label>
    Gift Message
    {{ input('text', 'fields[giftMessage]', cart.giftMessage) }}
  </label>

  <button>Update Cart</button>
</form>