Making Payments
Commerce supports taking payments from the customer at checkout and by a store manager via the Craft control panel. Payments can be required for order completion, deferred until later, or made in parts, depending on your store’s configuration and gateway support.
Payments are always via a payment form model, which is populated during a request to the commerce/payments/pay action.
#Choosing a Payment Method and Source
The payment methods available for an order depend on which gateways are configured and enabled, in addition to other criteria established by the gateway itself—the built-in Manual gateway, for instance, has an option to allow it only for zero-dollar orders.
Customers can select between the available gateways at an earlier stage in their order…
{% set gateways = craft.commerce.gateways.getAllCustomerEnabledGateways() %}

<form method="post">
  {{ csrfInput() }}
  {{ actionInput('commerce/cart/update-cart') }}
  {{ redirectInput('checkout/payment') }}

  <select name="gatewayId">
    {% for gateway in gateways %}
      <option value="{{ gateway.id }}">{{ gateway.name }}</option>
    {% endfor %}
  </select>

  <button>Continue to Payment</button>
</form>
…then use that gateway later via the cart’s gateway attribute:
{{ cart.gateway.getPaymentFormHtml({}) }}
If you have a single gateway, you can send its ID along with the payment details to do everything in one step:
{% set gateway = craft.commerce.gateways.getGatewayByHandle('stripe') %}

<form method="post">
  {{ csrfInput() }}
  {{ actionInput('commerce/payments/pay') }}
  {{ hiddenInput('gatewayId', gateway.id) }}

  {{ gateway.getPaymentFormHtml({}) }}

  <button>Pay Now</button>
</form>
When allowing customers to select a gateway, ensure they have enough information to make a decisions. Choosing between “Stripe” and “Braintree” may not be clear—but “Credit Card”and “ACH transfer” clarify how you’re using each service.
#Saved Payment Sources
We cover saving and reusing payment sources in a separate article:
#Outputting a Form
Commerce requires all gateways to implement a getPaymentFormHtml() method, and expects that it returns everything necessary to fully configure a payment in the front-end or control panel. This will mean different things for different gateways:
- The Stripe gateway outputs a minimal container, but registers the Stripe JS SDK and a special script that automatically bootstrap and render the Stripe Elements UI;
- A gift card or voucher plugin might accept a single “code” input field;
- A PayPal gateway might submit nothing at all, instead redirecting the user to pay off-site;
#Payment Form Models
A payment form model is a special container for validating and translating information for a payment gateway. Commerce takes care of populating gateway-specific models based on the order and incoming request data, so you won’t often have to deal with them directly.
If a payment fails, Commerce passes the payment form model back to the template under a paymentForm variable, which will contain information about the error.
#Model Attributes
Each gateway provides its own payment form, extending BasePaymentForm (opens new window). Generic models are available (like when using the “Dummy” gateway), but we only recommend using them for testing.
You should never accept credit card or bank details directly from a customer. Modern payment gateways use one-time identifiers to securely transport sensitive information, without ever requiring it to pass through your server. The following section on tokenization covers this in greater detail.
The CreditCardPaymentForm (opens new window), for example, supports a variety of card-like attributes to help simulate payments.
| Attribute | Validation | Description |
|---|---|---|
token | not validated | If a token is present on the payment form, no validation of other fields is performed and the data is ignored. |
firstName | required | The first name on the customer’s credit card. |
lastName | required | The last name of the customer’s credit card. |
month | required, min: 1, max: 12 | Integer representing the month of credit card expiry. |
year | required, min: current year, max: current year + 12 | Integer representing the year of credit card expiry. |
CVV | minLength: 3, maxLength: 4 | Integer found on the back of the card for security. |
number | Luhn algorithm (opens new window) | The credit card number itself. |
threeDSecure | not validated | A flag indicating whether 3D Secure authentication is being performed for the transaction. |
Never use real card numbers, even while testing gateways. Values submitted to the Dummy gateway may end up in a database backup or log file. For testing, 4242 4242 4242 4242 will satisfy the number attributes Luhn validation, combined with any cvv (three or four digits) and expiry month (1–12) and year (up to twelve years in the future).
#Tokenization
Whenever possible, gateways should pre-validate credit card information using the processor’s client-side JavaScript library. The Stripe (opens new window) plugin does exactly this—many other payment processors have equivalent tokenization systems that avoid sending sensitive information to your server.
#Full Payment at Checkout
The most common checkout process involves a customer paying in full by furnishing payment method details to a gateway.
In this example, we’ll assume a customer has finished shopping, and that we know what payment gateway they intend to use—it could be that the store only uses one gateway, or that they were given an opportunity to select a gateway in a previous step.
Send a gatewayId param to the commerce/cart/update-cart action to select a gateway ahead of time.
This template uses cart.gateway.getPaymentFormHtml() to render the form fields required by the payment gateway, posting them to the commerce/payments/pay controller action:
{# @var cart craft\commerce\elements\Order #}
<form method="post">
  {{ csrfInput() }}
  {{ actionInput('commerce/payments/pay') }}
  {{ redirectInput('commerce/customer/order?number={number}') }}
  {{ hiddenInput('cancelUrl', 'commerce/checkout/payment'|hash) }}

  {% namespace cart.gateway.handle|commercePaymentFormNamespace %}
    {{ cart.gateway.getPaymentFormHtml({})|raw }}
  {% endnamespace %}

  <button>Pay Now</button>
</form>
Using gateway.getPaymentFormHtml() is the quickest way to get form elements from the gateway; often, you’ll want to render and style these form fields based on the needs of your site and gateway.
Each gateway will have unique requirements for the data you submit when making a payment—consult its documentation for more information.
#Deferred Payment at Checkout
Commerce provides a couple options if you don’t want to require full payment from a customer to complete an order:
- Authorize a payment to be captured later by the store manager (not all gateways support authorize-only transactions);
- Configure your store to allow checkout without payment;
- Use the built-in Manual gateway to track an offsite payment process;
The first-party Stripe gateway supports additional payment plans via third-party services, but their availability varies by region, customer creditworthiness, and other factors.
#Checkout Without Payment
If the Allow Checkout Without Payment setting is enabled for a store, the customer can submit a POST request to the commerce/cart/complete controller action to complete the order without any payment.
<form method="post">
  {{ csrfInput() }}
  {{ actionInput('commerce/cart/complete') }}
  {{ redirectInput('/shop/customer/order?number={number}&success=true') }}

  <button>Buy Now + Pay Later</button>
</form>
Like the commerce/payments/pay action, the cart must have a valid email address and conform to the following store settings:
- Allow Empty Cart On Checkout
- Require Shipping Method Selection At Checkout
- Require Billing Address At Checkout
- Require Shipping Address At Checkout
You can check these settings in a template via the currentStore object:
{% if currentStore.allowCheckoutWithoutPayment %}
  {# ... or any other tests against the store settings and current cart state ... #}

  <form method="post">
    {{ csrfInput() }}
    {{ actionInput('commerce/cart/complete') }}

    <button>Submit Quote Request</button>

    <small>Once your order is finalized, we will request payment!</small>
  </form>
{% endif %}
As the example alludes, Allow Checkout Without Payment is typically most useful for businesses that collect “offline” payments via invoices, like wholesalers and distributors.
If you enable order completion without payment, completed orders will have the same status as any others. Make sure store managers are aware of this subtle difference and are prepared to confirm payment before fulfilling orders!
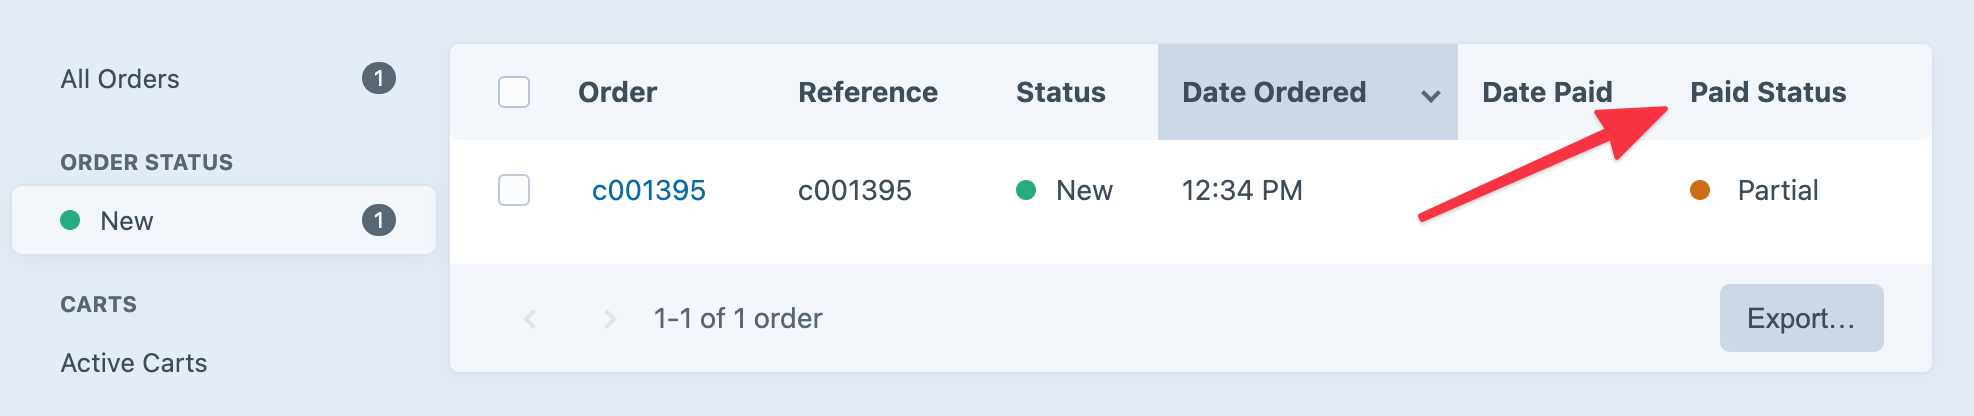
If you use these workflows, consider adding columns to the main Order element indexes for Date Paid, Paid Status, or Amount Paid so that it is clear which orders need attention.
You can also programmatically divert orders completed without payment into a different default status via events!
#Checkout with Partial Payment
A partial payment is one that’s less than an order’s outstanding balance at any point in time.
If you’d like to permit customers to check out with partial payments and the gateway supports them, you can enable the Allow Partial Payment On Checkout store setting to allow an additional hashed paymentAmount field when posting to the commerce/payments/pay controller action. If no paymentAmount field is submitted, the order’s outstanding balance will be used.
Multiple payments can still be made on an order when Allow Partial Payment On Checkout is off, as long as each payment is equal to the outstanding balance at the time it was made.
The partial amount cannot be entered directly by the customer; for security, the field must contain a hashed value in the cart’s paymentCurrency.
This example provides a dropdown menu that allows the customer to choose half or full payment at checkout:
{# ... payment form ... #}

{% set halfAmount = craft.commerce
  .paymentCurrencies
  .convertCurrency(
    cart.outstandingBalance * 0.5,
    cart.currency,
    cart.paymentCurrency
  )
%}

{% set fullAmount = craft.commerce
  .paymentCurrencies
  .convertCurrency(
    cart.outstandingBalance,
    cart.currency,
    cart.paymentCurrency
  )
%}

<select name="paymentAmount">
  <option value="{{ halfAmount|hash }}">
    50% ({{ halfAmount|commerceCurrency(cart.paymentCurrency) }})
  </option>
  <option value="{{ fullAmount|hash }}">
    100% ({{ fullAmount|commerceCurrency(cart.paymentCurrency) }})
  </option>
</select>

{# ... payment form ... #}
A customer may return to make additional payments similarly to the outstanding balance example, supplying a valid paymentAmount until the remaining balance is paid in full. The first partial payment or authorization, however, will complete the order—subsequent payments will not trigger a change in status.
You can use the Order::EVENT_AFTER_ORDER_PAID event if you need to add any custom functionality when an order is paid in full.
An order is considered “paid in full” as long as the total amount paid did at one point reach the order’s total—even if a payment is refunded.
#Paying an Outstanding Balance
You can allow a customer to pay the outstanding balance on a cart or order using the commerce/payments/pay controller action similarly to taking full payment at checkout, taking care to explicitly provide the order number whose outstanding balance should be paid.
There’s a full example of this in the example templates at shop/checkout/pay-static.twig (opens new window).
Here, we’re pretending the relevant order number is 12345, the customer’s email address is email@address.foo, and the gateway is already set on the order:
{% set number = '12345' %}
{% set email = 'email@address.foo' %}
{% set cart = craft.orders().number(number).one() ?? null %}
{% set cancelUrl = craft.app.request.getUrl()|hash %}

<form method="post">
  {{ csrfInput() }}
  {{ actionInput('commerce/payments/pay') }}
  {{ redirectInput('/shop/customer/order?number={number}&success=true') }}
  {{ hiddenInput('cancelUrl', cancelUrl) }}
  {{ hiddenInput('email', email) }}
  {{ hiddenInput('orderNumber', cart.number) }}

  {% namespace cart.gateway.handle|commercePaymentFormNamespace %}
    {{ cart.gateway.getPaymentFormHtml({})|raw }}
  {% endnamespace %}

  <button>Submit</button>
</form>
If you’d like to have the customer pay with a different gateway than whatever was specified on the cart/order, pass the gatewayId in the form:
{# ... #}
{{ hiddenInput('gatewayId', 1) }}
{# ... #}
A cart cookie is not created during this process; the user could be paying for a cart even while they have a different cart loaded.
#Partial Payments in the Control Panel
Store managers can specify an order payment amount using any gateway that supports partial payments, regardless of whether partial payments are allowed at checkout.
To make a partial payment in the Craft control panel:
- Navigate to Commerce → Orders.
- Choose a cart or order to view its edit page
- Select the Transactions tab and choose Make Payment.
- Select a gateway that supports partial payments to enter the payment details and amount:
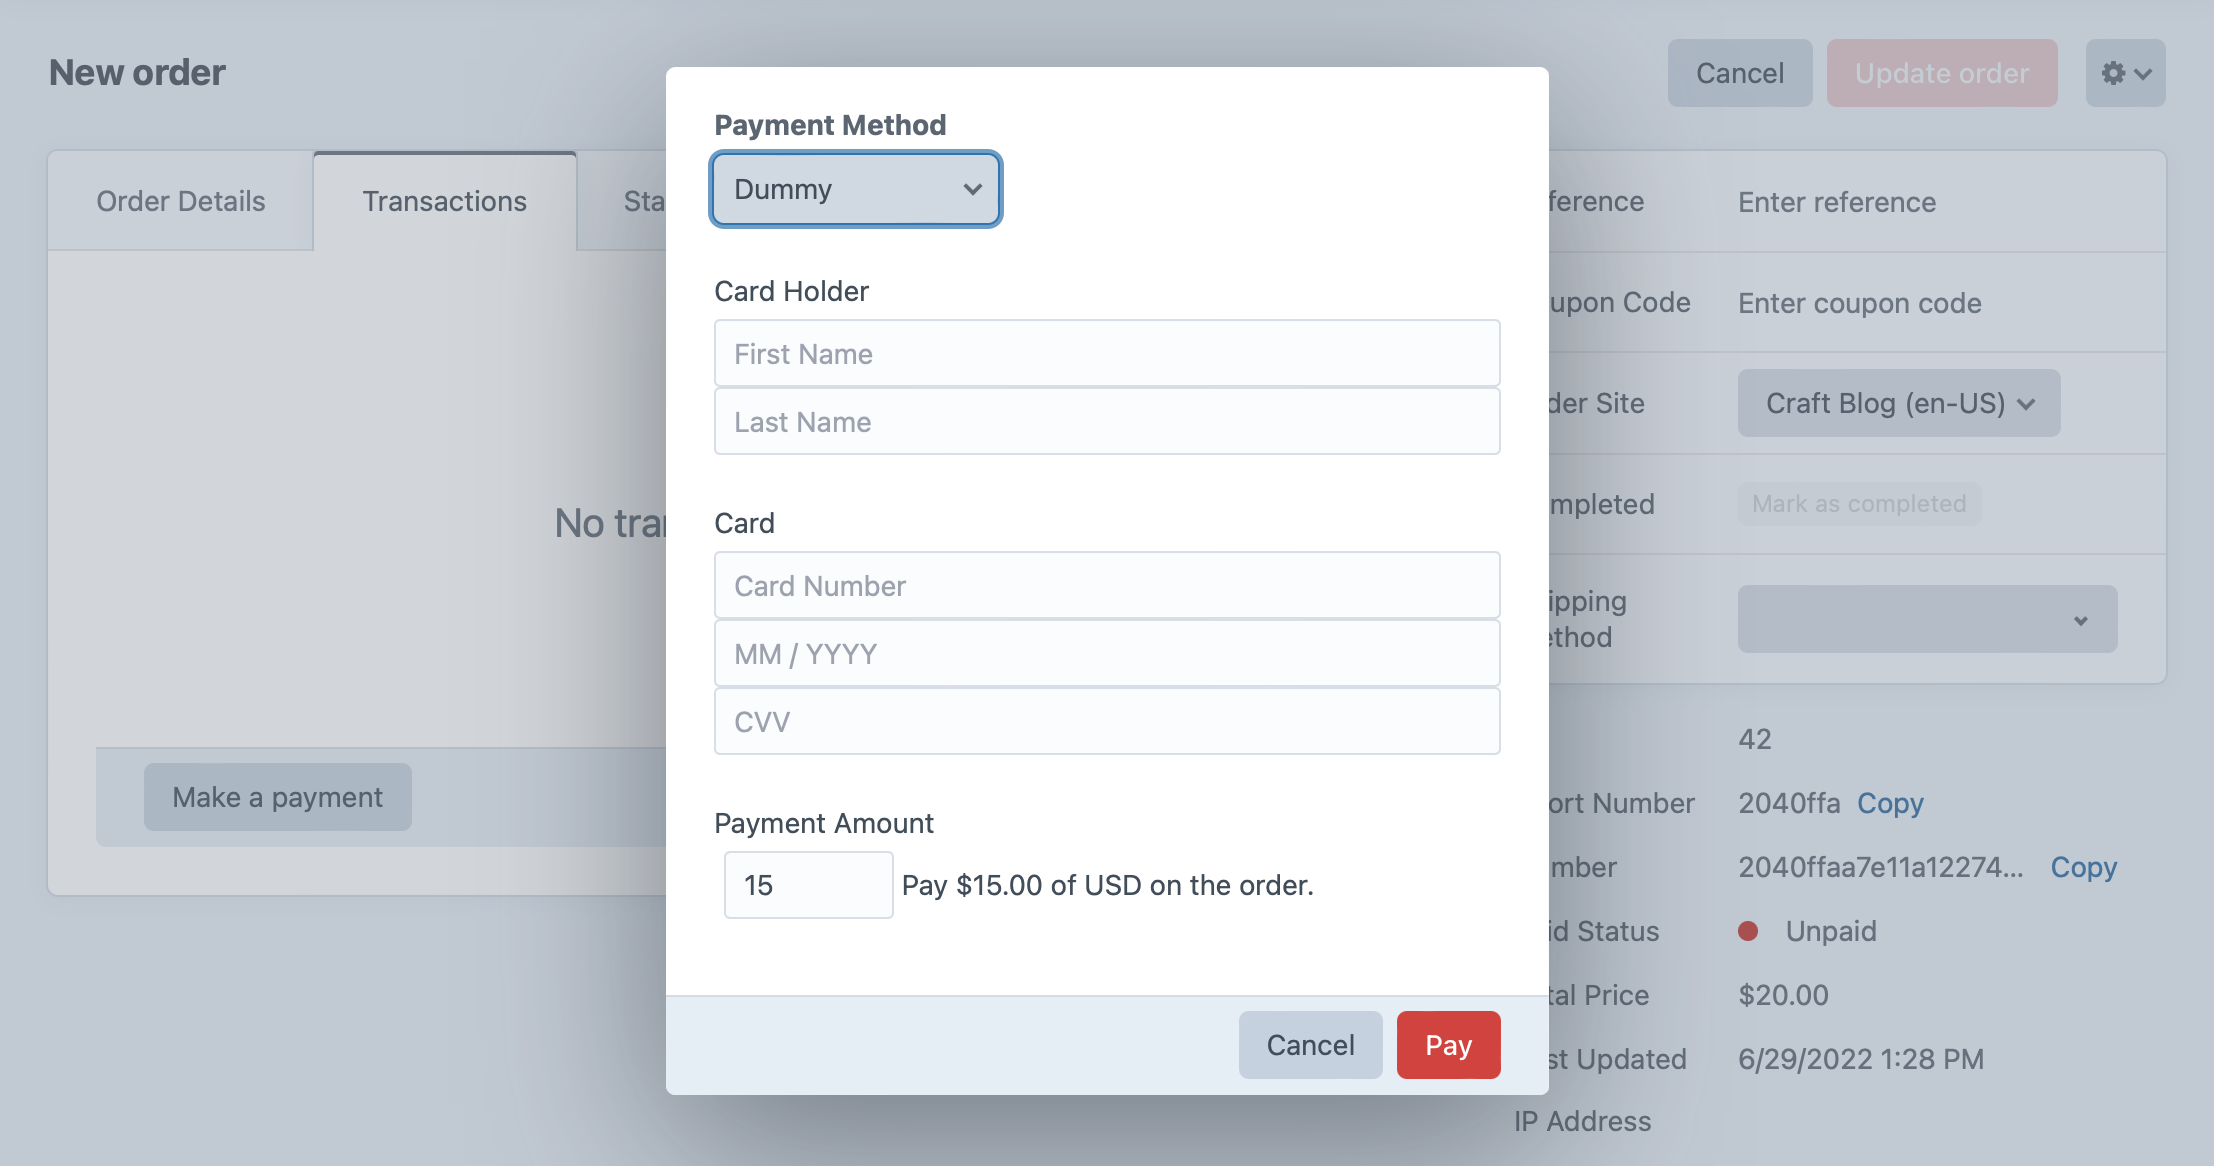
- Choose Pay to process the payment.
To more quickly identify partially-paid orders, a store manager may want to add the Paid Status column on the order index page.